| THE MG |
|
|
 | | October 5, 2010 - Trying to pick up from where I'd been, a month later, is a challenge.
Especially with wiring. But I've sorted out what I was doing and I'm starting to make forward progress again. Nothing big or exciting, just careful connection and testing of one circuit at a time.
entry 396 - tags: wiring | | | 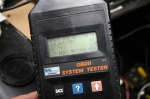 | October 6, 2010 - Woohoo!
This might not look like a whole lot, but it means the electrical system is live and I can talk to the engine computer. All the sensors that could be expected to have readings with the engine off have readings, and they're all accurate. The throttle is wedged slightly open in case you're wondering about that 11.8% reading on the TPS.
Once again, no smoke was released. This is all going well.
entry 397 - tags: wiring | | |  | October 6, 2010 - Time for a good day of work.
I have a goal! First, I need to get the exhaust system assembled. I figured out good O2 sensor locations, drilled the pipes and welded in bungs for the two sensors. Easy enough. I also added a new hanger at the back on the right muffler to match one that was already in place on the left.
entry 398 - tags: exhaust | | | 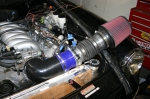 | October 6, 2010 - All the parts have arrived for the intake system, but I'm still trying to decide exactly how to plumb it.
It's hard to get a 4" tube in between my engine and radiator! So, for the time being, I simply laid the filter on the fender for testing.
entry 399 - tags: intake | | | 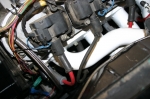 | October 6, 2010 - My clever header design does cause problems with the spark plug wires.
So I dragged out a set of wires from the old Cadillac and pressed two of them into service. It's not pretty, but it'll do the job.
What job? I'm aiming for the first start on the car. It's close, really close. So most of the day was spent doing a lot of the little jobs that hadn't been done before.
entry 400 - tags: plug wires | | | 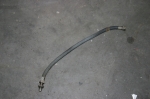 | October 6, 2010 - The last step before trying to start the car was to put some fuel in the tank and pressurize the system.
That didn't work! Well, it did, but not completely. The stock MG fuel system uses a couple of flared fittings that, typically for the British, are probably only found on Spitfires and MGs. One of them's on the fuel tank itself. So in order to plumb everything together, I retained one of the original fuel hoses in the return line. Bad idea. As soon as the system was up to pressure and excess fuel started to feed back to the tank, this thing started leaking like a garden hose. The inner rubber hose must be cracked in at least 10 places.
So I pulled the hose out and managed to piece together a replacement using one of the end fittings. After a bit of fiddling around, the fuel system was happy and full of pressure.
entry 401 - tags: fuel | | | October 6, 2010 - So?
Did it start? Well, no. It cranks happily and I did get it to cough really briefly, but overall it's just not exciting. Here's where the OBD-II scanner comes in handy. I can see that all the various sensors are reading properly - there's even measured airflow going through the intake on cranking - but the engine RPM is stuck at 0. If the computer doesn't think the engine is spinning, it's not going to try to fire the injectors or spark the plugs.
I checked the wiring for the cam angle sensor and the crank angle sensor. It's good in both cases. When Janel's home tomorrow, I'll check to make sure I'm getting spark. But that 0 RPM reading kinda tells me what I'm looking for first...
entry 402 - tags: start, wiring | | | October 6, 2010 - I posted a question about the no-start behavior of the MG on LS1tech.com, and got an answer almost immediately.
I need to disable the VATS system. That's an anti-theft setup that uses a resistor in the key. Since I'm not using the Camaro ignition switch or key, it needs to be bypassed or turned off.
A tuning program like HP Tuners can be used for the latter, and we have a copy at work. I also need to do a few other things such as turn off the EGR and the rear O2 sensors. HP Tuners is expensive - but luckily, Flyin' Miata has a copy. I'll have to pay to "mate" it with my computer, that that's fairly inexpensive relative to the cost of the program.
Will this fix it? Let's find out!
entry 403 - tags: start, VATS, HPtuner | | | October 7, 2010 - I borrowed a laptop with HPTuners software from work.
As soon as I got home, I hooked up the laptop, fired up the HPTuners software and used it to turn off a number of vestigial appendages in the car's computer. VATS anti-theft: off. EGR: off. Air pump: off. Rear O2 sensors: off. Skip shift: off. A quick upload and voila. The car should be ready to start.
I should point out that this is pretty common software. Most shops that tune GM engines have a copy. I suspect my local machine shop would be able to do this for me. You can also send your engine computer off to have it done elsewhere - for example, Painless Wiring will reflash the computer with these sorts of changes for free if you buy one of their harnesses. The fact that I have access to the Flyin' Miata copy simply means it's more convenient for me than most people, that's all.
Another alternative would have been to build an inexpensive VATS bypass. The plans are pretty easily found online, or you can buy one pre-made. There are lots of ways to solve this problem. Since I also wanted to turn off a few other features, the reflash was the best option for me.
entry 404 - tags: HPTuners, PCM, ECU, VATS | | | October 7, 2010 - It's aliiiiiive!
After reprogramming the computer - which took about 5 minutes, using software I'd never seen before - I ran upstairs and told Janel I had a surprise for her. She didn't know how close the car was to starting. I jumped in the car and hit the key. It cranked for a few seconds, then a few seconds more. But it was trying. So I tried again and VAROOOOOOOOOM! Lots of noise, lots of revs, and a running engine.
I caught it all on video. It's a cinematic masterpiece, with expository dialogue, a build-up of tension and then a big climax followed by a happy denouement. In case you're wondering, I was talking to Janel who is standing at a safe distance behind the camera, taking refuge behind the Mini.
Watch it!
It wasn't completely successful. The first few times it didn't want to stay running more than a couple of seconds. It eventually settled down and kept running, but at a 2500 rpm idle. Since the main goal was to simply get it to work, I declared that enough. Even just a few seconds of running was enough to get the paint on the headers to bake in and release a nice cloud of smoke. I'll spend some more time cleaning up the wiring and hunting for vacuum leaks. Maybe this weekend I'll let it run for a bit longer to see if the engine speed will settle down as the computer re-learns this engine. The change in behavior from the first start to the fourth was notable.
First I need to blow the smoke out of the garage. Whew!
entry 405 - tags: first start, engine, video | | | October 12, 2010 - More progress.
A quick test with a smoke machine uncovered a vacuum port on the back of the intake manifold, underneath the MAP sensor. Almost impossible to see, and now capped. With that done, the idle quickly settled down under 1000 rpm and was continuing to improve when I shut things down. So it's looking as if the engine is a happy bunny.
I found an error in the wiring diagram I'm using. The engine computer is supposed to have a constant 12v feed to store all the various internal settings. According to the diagram, that feed was switched power so it only turned on with the key. Every time the computer loses power, it needs to relearn various settings such as the idle - so this would have been an annoying problem. Fixed now!
I'm working on related wiring now. The coolant gauge is hooked up, but the engine hasn't been hot enough to test it yet. I'm working on the tach now.
I also picked up all the pieces I need to complete the braking system. At least, I think I have all the pieces now. I'll start working on that soon, as it's the biggest step preventing me from actually driving the car. Ooooo!
entry 406 - tags: brakes, wiring, engine | | | October 13, 2010 - I'm all excited about working on the car right now.
But I'm very easily side-tracked. For example, I need to build the brake system. I had my head in the front wheel wells trying to figure out the best way to route the lines - it's hard to keep them away from the header - when I spotted the wiring for the front lights dangling. They'd been damaged at some point in the past and repaired poorly with solder. Well, it would be easier to patch them before I assemble the suspension, so I quickly hooked them back up with good connections. Then, of course, I wanted to see if they'd work and that led me to the steering column combo switch, which came from a Miata. So I ended up poring over Miata wiring diagrams and MG diagrams and trying to figure out how they each work so I can splice them together.
At the end of the night, I had functioning headlights but I hadn't energized the turn indicator circuits yet, and I'd temporarily run a switch in place of the headlight relay as I puzzled out the logic of both systems. Naturally, I'd made no progress on the brakes.
But it was fun, and I've turned the MG into a giant V8-powered flashlight.
entry 407 - tags: wiring, lights | | | 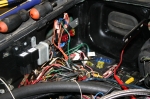 | October 19, 2010 - The wiring is moving right along.
It may not look any better than it did before, but the majority of the MG circuits are hooked up now, and the back half of the car is almost fully functional. Reverse lights, taillights, brake lights - all I need to do is make the flashers work, and that's just a matter of figuring out where in the harness the flasher unit was plugged in before! The main front/rear wiring harness has been relocated to run inside the car as there are hot exhaust pipes running back and forth underneath now, and the length is pretty much perfect. The wiring is really proving to be an easier job than it should be, in large part because the lengths of both the MG and GM harnesses have been bang on.
entry 408 - tags: wiring | | | 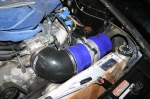 | October 19, 2010 - The intake is coming along.
It's a bit of an awkward thing, dropping from 4" to 3.5" (the diameter of the MAF) and then down to 3". I could probably keep it 3.5" from the MAF to the filter, but 1) I have a filter with a 3" inlet and 2) I have a box full of nice 3" piping and mandrel bends! Besides, the actual throttle body size is pretty much 3".
Tight packaging though. No surprise there.
entry 409 - tags: intake | | | 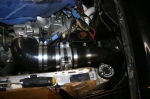 | October 26, 2010 - The completed intake.
All of the silicone pieces needed to be cut down as short as possible to allow the MAF to tuck into a spot beside the power steering reservoir, but it all fits. An S-shaped tube made of stainless steel exhaust mandrel bends joins the filter to the MAF, and also has a tab to support the intake. It's mounted to a rubber isolator, but I think the engine movement will be small enough that the silicone pieces will be able to take up the slack.
Sharp eyes will notice that the blue silicone has magically turned to black. This was due to clever use of electrical tape. It's not high-end, but it worked a treat!
entry 410 - tags: intake | | | 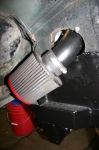 | October 26, 2010 - Here's where the filter lives, tucked in just below the headlight and behind the turn indicator.
It'll get splattered with debris from the front wheel at the moment, but clever use of a metal shield will solve that problem.
You can really see the difference between the new, POR-15 covered sheetmetal and the the 38-year-old original stuff!
entry 411 - tags: intake | | | 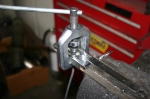 | October 26, 2010 - With the intake done, it's time to work on the brakes.
The master cylinder and the calipers are in place, but every line has to be custom-built. It's not the first time I've done this - I've built the braking systems on two of my cars from scratch and modified a couple of others - but that doesn't make it easy.
I started by picking up a roll of brake line. You can buy pre-flared lengths of line with the fittings already installed, but you get a cleaner fit if you cut and flare your own. I've learned the hard way that brake flaring tools are one spot where it makes sense to spend money. A good tool makes better flares, is easier to use and won't break in half after a couple of tries like a good one.
entry 412 - tags: brakes | | | 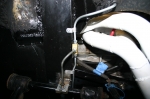 | October 27, 2010 - The front lines are done.
The upper line in the picture drops straight down out of the master cylinder and through the body. The header is pretty close to that master, so I wanted to get the line away from it as quickly as possible.
I originally had a different routing that seemed really clever as I put it together. As soon as I was done, I took a look at it and it was obvious how it should run. So I took it apart again...
The line for this wheel (the left front) joins up with the flex line at the pivot point for the upper control arm. The bracket is actually a Miata part that's originally used to perform the same job on a clutch line. The flex lines are standard Miata parts, and that OE mounting makes for a nice solid connection.
The line for the other wheel is fairly convoluted. It drops down, through another hole in the sheetmetal, over a frame rail, along the back of the steering crossmember and under the oil pan, then back up the way it came to a similar bracket on the right side. Not an easy one to make, but it's done now. The lines are anchored as much as possible to keep them from vibrating. I used some aluminum brackets that can be shaped to fit, but I'm going to keep an eye on them to make sure the brackets themselves don't fatigue.
entry 413 - tags: brakes | | | 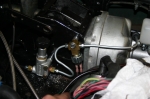 | October 27, 2010 - With the front lines finished, I moved on to the rears.
First, I needed to plumb in the pressure switch for the brake lines and the adjustable proportioning valve. The correct front/rear bias makes a huge difference to the effectiveness of a brake system, so I want to be able to fine-tune it for this particular mongrel. I considered mounting it in the cockpit as I did on a couple of my other other cars, but a street car like this one shouldn't need constant tweaking like those track-biased beasties. Besides, the routing works better this way.
The line from the master takes a bit of an odd route, circling around the body of the master. This gets the line away from the header and also gives me a chance to anchor it down. As an added bonus, it also gives more room for the vacuum line that feeds the booster.
entry 414 - tags: brakes, proportioning | | | 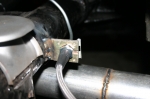 | October 31, 2010 - The brakes are done!
There's one long line that runs from the proportioning valve, over the brake pedal box, through a new grommet in the body, down to the bottom of the footwell, along the outside sill, through another grommet and finally to a hard line anchor like this one by the rear axle. Whew!
Once it gets to the rear axles, there's a tee and the line splits to the left and right rear brakes. Unfortunately, I couldn't figure out a way to run a hard line straight to the calipers. They use a banjo fitting, and the only banjo-to-flare adapters I could find were AN fittings.
This drives me nuts every time I work on brake systems. Modern cars use metric brake fittings. My local auto parts stores only have SAE fittings. And the performance aftermarket only uses AN. It's ridiculous. No matter how much I try, I simply can't use a consistent type of fitting through the whole car.
To make things more fun, SAE and metric fittings use a 45 degree flare. AN fittings use a 30-something degree one. They're not compatible, and you need a separate flaring tool to make the AN flares. So in order to adapt my hard lines to that AN-to-banjo piece, I'd have to buy another flaring tool. I don't know why the racing industry worships at the altar of AN fittings, they're only nice to have if you don't have any production items in the whole car. Otherwise you end up mixing and matching.
So, in order to deal with this banjo fitting on the calipers, I decided to use off-the-shelf Miata flex lines. A flex line is not needed here because there's no relative movement between the axle and the caliper, but they'll do the job and are easily replaced if the need arises. For the connection between the hard line and the various flex lines, I used some brackets off a wrecked Miata. It's interesting to note that this particular design of anchor is the same as used on the MG in the first place. Well, it works!
So, the plumbing is all done. I'll have to bleed them at some point in the future, and then I'll undoubtedly find some problems...
entry 415 - tags: brakes | | |
|

 THE DIARY