| LIFE OF A GT |
|
|
 | |  | July 2, 2011 - Buffing time!
Try to guess which side is the "before" side. I started off with a fairly mild setup, a gentle foam pad and a less aggressive compound. That's the result on the roof there. Not bad, but my initial sanding was with some pretty coarse paper. I followed it up with lighter paper, but either I don't have enough patience (most likely) or the setup simply wasn't aggressive enough.
So, after some experimentation, I ended up with my most aggressive combination of abrasion: some old 3M Product III rubbing compound and a wool boot on the rotary buffer, set on 3.5 out of 6. That did the job.
I did all my experimentation on the hood because I figured that if I really screwed it up, it would be the easiest to repaint. No worries there, I found I didn't burn anything up. One big help was the Meguiars training video, which they've uploaded to YouTube. Sure, there's a lot of advertising for Meguiars in there, but it shows you how to move a buffer properly and a lot of good techniques.
entry 608 - tags: buffing, paint | | | 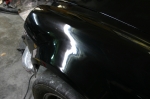 | July 2, 2011 - Here's that flare that had the big runs in it.
It's not perfect, but it's a whole lot better. I won't have to try to avoid this angle when taking pictures of the car anymore! You can see that my initial sanding marks are still there, even after using 2000 grit and a couple of passes with various polishing compounds. By the way, I followed up that 3M rubbing compound with some Meguiars polishing compound and then a swirl remover. The sanding marks actually kinda make it look like a well-cared-for but old enamel paint job. Instant patina!
I know, I know. But I'm going to call this good for now so I can get the car up and running again. The goal was to get rid of the worst of the runs so I can put the badges and side trim on. I can do some more finishing work later on if I feel the need. Right now, of course, I'm looking at a spotless black car under fluorescent lights.
I did learn some neat techniques for getting rid of runs without wet-sanding the entire car. Although the car did need it due to orange peel. I'll get pictures of them later, as I know I'll probably come across at least one more that will need a touch-up.
entry 609 - tags: buffing, paint | | | 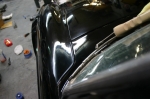 | July 3, 2011 - I left one small panel on the car alone so I would have a good before/after comparison.
That's it at the base of the windshield. It made a good test for the quality of my buffing too! The untouched panel is visibly rougher but has about the same shine as the fender does, so it's worked out pretty well.
entry 610 - tags: Buffing, paint | | | 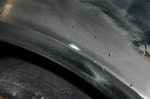 | July 3, 2011 - It's not all good news, though.
Whilst trying to get rid of the worst of the drips, I managed to sand through the paint. No, not with the rotary buffer that everyone warned me about, but with 2000 grit sand paper. I wasnt trying to sand right on the lip but I must have had the angle just a bit off. Argh.
I left it alone while I continued with the rest of the car. I'll touch it up eventually, but I figured I should make sure there aren't any other spots that will need work first.
Once everything is polished, it's just a small white spot on the lip. Not too obvious in real life.
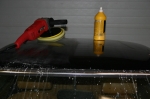
entry 611 - tags: buffing, paint | | | 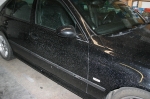 | July 3, 2011 - Buffing is a messy job.
I probably should have moved the other car out of the garage! If the color looks familiar, that's because it's the same one I used on the MG.
entry 612 - tags: buffing, mess | | |
|

 THE DIARY