| LIFE OF A GT |
|
|
 | |  | April 11, 2008 - The biggest problem is this.
A Viper alarm system. I hate car alarms. They're designed to make cars not work. And some cars - especially LBCs - don't need help. The first thing I did was pull this accursed box out.
entry 9 - tags: intro, electrical | | | 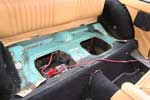 | April 11, 2008 - There's a battery drain somewhere.
I'll have to hunt it down. But pulling out the rear seat does a good job of illustrating the original color of the car!
entry 12 - tags: electrical | | | September 9, 2010 - Power!
With a few spare minutes in the garage and a freshly connected main relay, I hooked up the battery to the car for the first time. First, of course, I had to come up with a good grounding point. Hopefully I did.
When I connected the battery, nothing happened. That's good.
Then I flipped on the main circuit breaker. Nothing happened. That's good.
Then I turned on the ignition and saw a light come on inside the dash. Must be the alternator light. I also heard the main relay click over and the fuse panel for switched power came alive. That's good!
No sparks, no shorts, no nasty smells. All the smoke stayed inside the wires. This may not seem like a big step, but now that I know I have a smoke-tight electrical system it'll be a lot easier to trace wires and determine that everything is hooked up correctly.
Woohoo!
entry 393 - tags: wiring, smoke, electrical | | | 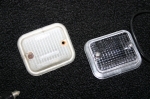 | November 11, 2010 - Sometimes you just have to do little stuff that feels good.
The reverse light lenses on the back of the car looked awful. Back when the MG was still on the road (two years ago!) I ordered a new set. I put them on today and wow, they look good! Two minutes worth of work and I get a feeling of satisfaction.
Of course, this also meant I needed to make sure they were working. Naturally they were not. After a bit of digging around, I found that I'd misidentified the feed wire from the front of the car. I swapped that around, plugged in the lights and one worked! The other, not so much. The cracked lens had let in dirt and moisture, so it was all crusty inside and the contacts were corroded. I stuck it in the bead blaster, gave it a quick shot and it looks brand new! I never thought I'd use the blaster to rejuvenate electrical parts, but it really works nicely on bad contacts. And voila, bright lights in the rear.
Of course, while I was working on electrical stuff I decided to find out why the turn indicators weren't working. After a bit of digging around, I found out that the turn indicator wiring passes through the hazard light switch. Okay. I plugged that in and got...inconsistency. The flasher worked sometimes, but usually not. I checked voltages and found out there was a lot of resistance inside the switch. Basically, the contacts were all corroded. So I disassembled it, stuck it in the blaster and put it back together. Pretty interesting to do, actually. Now I know just how a Lucas hazard light switch works!
That got rid of my resistance, but the flashers are still have a bit of character. There's just enough unevenness in the tempo of the flashes to make you realize it's a mechanical relay working off heat instead of an electronic one!
Looking at the Moss catalog, it appears that hazard switch I fixed is a 1972-only part. It changed in 1973.
entry 443 - tags: wiring, reverse lights, electrical, turn indicators | | | 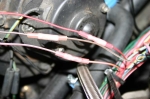 | November 18, 2010 - I'm still working my way through the wiring.
Not quickly, just a circuit or two at a time. The final MG circuit got power yesterday - horns and interior lights. The car has a most hilarious BOOOOP! horn from the factory. It should have two, but one has not yet come to the party.
One of the big debates in automotive aftermarket circles is "solder versus crimp". Solder advocates say that crimps are failure-prone and difficult to do well. Crimp advocates claim that solder joints are likely to crack and fail. Personally, I'm in the latter camp - a good crimp joint works better than a solder joint in the high-vibration environment of a car. It's telling that there are no solder joints in a factory wiring harness, for example.
But the crimps need to be done well. I use good-quality crimp connectors with a heat-shrink sleeve over top. The heat-shrink not only waterproofs the connection but also provides mechanical support for the wire so there's no way for it to vibrate and crack. The crimping tool itself is a ratcheting one with interchangeable jaws. It's a bit harder to find than the usual cheap-and-nasty variety, but you can often find them for $20-40. The ratcheting action prevents the tool from releasing until the correct squeeze has been put on the terminals - most people don't crimp them hard enough.
entry 457 - tags: electrical | | |
|

 THE DIARY