| LIFE OF A GT |
|
|
 | | 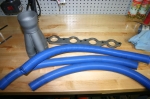 | February 20, 2010 - Of course, building the exhaust means building the headers.
I've been digging around trying to find recommendations on primary tube length, but to no avail. A diameter of around 1.625" or 1.75" seems to be the one to use, and since the last header I built used the latter I will probably do so again as I have some spare parts - including this collector.
The header flange is GM part 12480130, and it's 7/16" thick. Beefy! The blue pool hose? Well, that's how I do my initial layout testing. I'll figure out the general routing of the tubes first then fine-tune them with a very cool tool that will be making an appearance soon.
But there's no need for it. When I installed the steering column and started to figure out where the collector was going to go, it became obvious that there was no way to run a long-tube header in the car. I simply don't have the room - and that's with the collector in the wheel well! So it appears I'll have to settle for good flow instead of a nice extraction design. Oh well, it'll be an improvement over the stock units at least. And it should be easier to make this way.
entry 291 - tags: header, headers, exhaust | | | 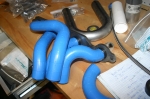 | May 16, 2010 - Time for the headers!
I've built a couple of headers before - most memorably, the one for the Targa Miata - so I have a fairly good idea what I'm doing. In this case, packaging is my biggest problem. I'd love to do a nice equal length, long-tube header for maximum power but I simply don't have the room for it. So I'm going to settle for simply fitting everything in place. I figure it'll be lower restriction than the stock stuff (hopefully) and it's certainly not tuned length.
The key to making this relatively easy is the Ice Engine Works "header lego". It's a box full of little blocks that snap together. They come in straight and in 2", 3" and 4" radius bends. Each block is 1" of tube, which really helps when it comes time to make primaries of a particular length. In this case, I'm just trying to get things to fit. There's a fairly massive length difference between the front and the back cylinders.
The initial mock-up was done on the car and transferred to the work bench.
entry 322 - tags: header, exhaust | | | 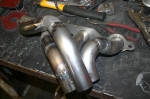 | May 16, 2010 - With a wave of the magic welder, the plastic mock-up has been transformed into metal!
Well, the magic welder, magic chop saw and magic sawzall. I tweaked the design a little bit to make it work better and to take into account the various diameter bends I actually had on hand. It worked out well, there's a bit of art to the way the front two tubes work together and it all comes together nicely. These are 1.75" tubes, by the way.
entry 323 - tags: exhaust, header | | | 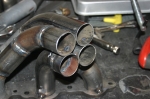 | May 16, 2010 - All four primaries come together nicely.
The next step is to fit the collector on. Since my collector is a cheap bent piece of pipe instead of a nice slip-on, I'll have to weld up the hole in the center as well as make sure they seal well in the deep gaps between the tubes.
This is the driver's side, which has the steering column and the brake booster to deal with. When I think about it, I didn't really have to do anything to cope with those parts, so I could probably make the passenger's side as a mirror image of this one. I don't know if I have enough 2" radius bends to make that happen, but it might be worth trying simply to avoid problem-solving a second time.
entry 324 - tags: exhaust, header | | |  | May 18, 2010 - Before attaching the collector, I had to seal up the gaps where the four pipes come together.
This little pyramid might help the flow from the four primary pipes merge. Or maybe not - but it won't hurt.
entry 325 - tags: exhaust, header | | | 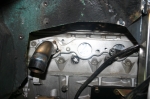 | May 18, 2010 - The passenger's side header wasn't a mirror image of the first, partly because the right head sits a bit further back than the left one.
I decided to try building this one out of metal first. I used the header lego to figure out the general layout of the tubes (cleverly coming up with almost the exact same tube routing as the other side) then built them tube by tube. This is more traditional way to build a header than the lego method. It ended up being about the same level of difficulty, although having the lego helped out considerably when it came to figuring out the length of various bends.
The big advantage to this method is that I was able to be more precise in placing the collector than I had been when I built the other version on the bench. It was close, but this one was better.
entry 326 - tags: header, exhaust | | | 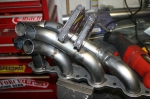 | May 18, 2010 - The first three tubes were tacked into place with the flange bolted to the engine.
The fourth one was test fit on the car, then I did the finishing placement on the bench. It ended up perfectly placed - the two long tubes are nicely parallel, which means nothing for flow but looks pretty.
When it came time to put the collector on, it was exactly where it needed to be.
entry 327 - tags: exhaust, header | | | 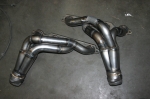 | May 18, 2010 - The two finished headers.
You can see where I had to cheat the angle of the collector on the driver's header (seen here on the right side) a little bit, but I'm pretty happy with the result. They fit well, give me full access to spark plugs, can be installed without removing the engine and should give decent performance even if they're not all equal length. I just have to finish one more more 2.5" tube to connect the right header to the X pipe, add a couple of O2 sensor bungs, and the exhaust will be complete. Woohoo!
entry 328 - tags: exhaust, headers | | | 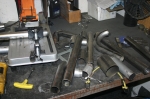 | May 18, 2010 - The debris of header building.
They were built out of mandrel U bends. If I have the count right, it took one with a 2.5" radius, one 2" radius, four 3" radius and a couple of other bits and pieces that were left over from previous projects. The primary tools were a chop saw and a belt sander.
entry 329 - tags: headers, exhaust | | |  | August 31, 2010 - I'm working on routing all the various hoses and wires, and I have to make sure they stay clear of the hot stuff.
Which means it's time to bolt the headers on. And oooooh, do they look good. Yum!
However, I did discover a problem. When I built the headers, I bolted the flanges on to the head using just the two end bolts. I did the same every time I checked fitment as well. Except this time, when I decided to put in another couple. And that's when I realized that I'd welded the flange on upside down on the driver's side! The end holes are symmetrical, but the others aren't. Oooops.
Luckily, there's a lot of meat on the flange and so all I have to do drill some new holes. I can use the gasket as a template. So at the moment, it looks as if my mistake won't be difficult to fix.
entry 381 - tags: headers, mistake | | | 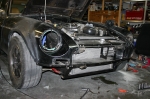 | March 15, 2011 - The car getting a lot uglier in a hurry.
Since I don't know for sure yet if I'll use the Special Tuning airdam - the nose does look a little unbalanced right now - I'm going to paint both it and the lower section together. And of course, all the lights and chrome has to come off. Poor thing.
I also removed the headers so they could be milled flat. I figure the car won't be going anywhere for a while, and the flanges are a bit warped from the welding heat. I can remove them without even lifting the car! Try that on a Camaro. Or a Miata or stock MG, for that matter. I got lucky.
entry 559 - tags: header, bodywork | | |
|

 THE DIARY