| LIFE OF A GT |
|
|
 | | 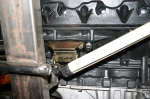 | February 8, 2009 - A view of the driver's side motor mount.
Yeah, it's close to the steering column. I might be able to make it work with some artfully curled tubes - or I'm wondering if I can use the extra pair of bosses on the block and support this side of the engine a bit further back.
I did what is hopefully the final cutting of the tunnel today and welded the frame rails in fully. It's not easy welding 1/8" steel to thin floorboards from below without burning through. It's not pretty work, but it'll hold.
entry 173 - tags: mounts, fitment | | | March 29, 2009 - There haven't been any updates for the past month, I know.
That's because I've been working on other things - the Targa Miata went to Laguna Seca for a two-day track event and my editor feels I should be working on my new book instead of hacking up an old MG. So I've been concentrating on that.
I did pick up a new set of motor mounts, though. They'll give me a little more clearance for the steering column. Not a lot, but hopefully enough. I'm also getting concerned about clearance between the alternator and the steering rack pinion. I know there are a number of accessory mounting options for the LS engines (thank you Car Craft for a well-timed article there) but I'd prefer to maintain the Camaro setup because, well, I have one.
In other news, there's a Austin Healey Sprite in the garage right now. I've been tasked with making the freshly built 1275 engine run. Part of my payment for that is an MGB GT body. Hopefully it'll provide a few useful bits and pieces to help restore Janel's.
So, there's not going to be much work on the MG for a little while yet. I really need to be working on that book!
entry 175 - tags: mounts, fitment | | | January 20, 2010 - With the engine back in the car, I determined the final location of the big heavy parts.
In short - quite far back and nicely placed vertically. I'll have just over 5" of air under the sump at my expected ride height, but the hood closes all the way. The shifter is in just about exactly the stock location.
So the next thing to do was to build motor mounts. The passenger's side was straightforward enough, but the driver's side was a real challenge. The mount is extremely close to the steering column, enough that I'm going to have to weld the lowest universal joint to the shaft instead of bolting it on, as there isn't enough room for the bolt to clear the mount. I finally figured out how to put a motor mount bracket in there, but I don't think I can create the lower section until the engine is out.
I did check the clearance on those new headers I brought home. Nope, they won't fit. The passenger's side is good, but the driver's side is not. That steering column again. The headers are obviously from a car that is several inches wider than our little beastie. I can see the possibility of headers that require the removal of the steering column to install - I'll try to avoid that.
The transmission support will take the shape of a new crossmember - pictures to come. I need to make this removable so I can actually take the engine out of the car again, which made everything much more difficult. I'm almost there. This is a very satisfying stage of the build.
entry 256 - tags: motor mounts, packaging | | | 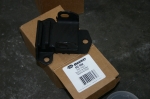 | January 14, 2011 - I spent part of the day today talking paint and bodywork with the local paint shop.
Hightower supply has been very helpful to me. I came home with some new primer and a big bucket of body filler to make those fender flares all pretty.
I also want to try some rubber motor mounts in the car. I think some of my noise is vibration coming through the mounts. I put some competition motor mounts on Janel's street Miata and got a similar noise. Now, the mounts I used were generic small block Chevy (pre-LS1) mounts from Energy Suspension. I went to NAPA, opened up the Big Book Of Motor Mounts, and spotted this on the first page. I don't know what the application is - probably every V8 from General Motors from 1960 to 1997 - but I think that's it. I just hope the softer mounts don't let the exhaust and other bits and pieces lean up against each other.
entry 531 - tags: motor mounts, bodywork, paint | | | January 16, 2011 - I swapped the motor mounts out today.
It was a reasonably easy job, probably much easier than most production cars. It'll be even easier next time, since I turned one of the long bolts around so it runs back to front instead of front to back. Seems simple, but next time I won't have to pull the alternator...
I believe it was a success. The car doesn't boom and vibrate as much. It's still vocal but you can tell the noise is coming from the back of the car through the exhaust pipes instead of simply through the chassis. A bit more work with sound deadening in the back half of the car and I think it'll be quite good.
entry 533 - tags: motor mounts | | | July 13, 2011 - I found something else while I was under the car: my vibration.
It wasn't the exhaust as I've always thought. I discovered that the block is actually hitting the driver's side footwell. Not very much of it, but you don't need much. That's where the deep vibration under power comes from. Unfortunately, it's in a spot that's pretty much inaccessible.
There's no way you can reach it from the engine bay. From inside the car, I just can't figure out how to cut the panel to give myself the needed 1/8" of clearance. The interference is right beside the throttle pedal, where there's a nice deep insert for the steering column. I just can't get in there.
Using a prybar to open up the clearance a bit isn't an option either. The multiple folds of the sheetmetal and a nice 90 degree seam mean that this is one very solid piece of car. Besides, even if I did manage to move the sheetmetal I'd probably have trouble getting the throttle pedal clear.
Two options present themselves. One, pull the engine and grind down the offending protrusion on the block. Ugh. Two, see if there's any slop in my motor mounts that will let me rock the engine over slightly. Or maybe I could shim it. Come to think of it, this could be because of my change to rubber motor mounts. I'll see what I can do there.
entry 629 - tags: motor mounts, interference | | | July 18, 2011 - I spent most of the weekend on other things, but I did crawl under the MG to take a shot at solving the vibration.
One of my thoughts was that I might be able to slot the motor mount holes to move the engine slightly. So I was quite happy to see that they were already slotted, and that I had lots of room to move the engine in the direction I wanted to move it.
After some wrenching, levering and jacking, I had the engine tightened back up in my new location. The gap between the body and the offending bump on the block was a bit larger. A test drive showed that the vibration was dramatically decreased. I'm not even sure if it's still hitting - there's still a bit of a rumble under certain conditions, but it seems to be more restricted to certain RPM ranges which tells me I'm dealing with an acoustic resonance. So, good progress then!
entry 631 - tags: motor mounts, interference | | |
|

 THE DIARY