| LIFE OF A GT |
|
|
 | |  | December 1, 2009 - Panhard rod mount!
As I've mentioned, I'm using the Fast Cars suspension as a base for my design - albeit with a bit more adjustability built in. In that case, the Panhard bar mount is in front of the axle. This means it has to be fairly tall, and it has some support braces to keep it from flexing under side loads. The roll center of the rear axle is the center of the Panhard bar, and the usual geometry means the bar should be in line with the center of the axle at ride height. Thus the long bracket design.
I've decided to put mine behind the axle. This lets me use a straight bar instead of having a bend to clear the nose of the differential. It also means I can take advantage of the contours of the body and use a much shorter mount. It's also a bit of an odd shape and will have a very solid connection to the body of the car. It's made of 2x3 tube instead of the 2x2 in the Fast Car setup and the extra width is in the right place to resist lateral loads. It should be significantly stronger but there's not much clearance for the bar. I think I'll be able to pull it off though.
I should have this welded in to place shortly, I just have to pull out a bit of carpeting inside the car so nothing catches on fire. You know, the usual.
While underneath working this out, I think I figured out how to mount a sway bar to the rear. Hmm.
entry 220 - tags: rear axle, panhard, suspension | | | 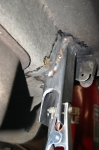 | December 2, 2009 - The Panhard bar mount welded in place.
This is one solid sucker, I'm very happy about that. The bend in the body makes it good and strong.
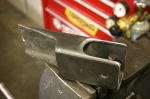
entry 221 - tags: panhard, rear axle, suspension | | | 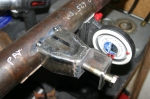 | December 2, 2009 - With the body mount in place, it's time to build the one on the axle.
I welded one of the threaded bungs into a length of 1" pipe and attached it to the body. Then the axle got put into place and I measured the distance from the bar to the axle. That gave me what I needed to figure out what the mount on the axle should look like.
I went through a number of possible designs for this. The final one - shown - has a bracket made of a section of 2x2 bar with a nice thick wall. It's welded to a support made of 2x3 bar, reshaped to meet up. There's a nut welded on the back side of the bracket. A lot of designs I see in circle track catalogs put the bolt in single shear instead of double like this, but I prefer this design.
entry 222 - tags: rear axle, panhard, suspension | | | 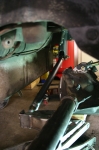 | December 2, 2009 - And voila!
The rear suspension linkages are all in place. The axle is sitting quite a bit lower than usual to show off the bar. In case you're wondering what a Panhard bar does, it provides the lateral support for the axle.
The two outer (lower) trailing arms keep the axle straight in the frame and transfer the brunt of the power to the chassis. The center link at the top of the diff keeps the whole thing from rotating under power and lets me set the pinion angle. And the Panhard bar transfers the side loads into the frame. With this whole lot in place, the axle can twist up and down to let the wheels follow the road, but it will always stay properly aligned to the chassis. Cool.
It's not completely finished, of course. I tucked that Panhard bar into a pretty tight spot, and it only clears the back of the axle by a millimeter or so. More importantly, the bracket on the axle hits the body of the car. A bit of reshaping will solve that problem, of course, but I think I'll have to pull the fuel tank to do it properly. No worries, that looks like a pretty straightforward job.
entry 223 - tags: panhard, suspension, rear axle | | | 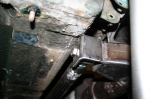 | December 2, 2009 - Here's the interference between the body and the Panhard bar mount.
It's not dramatic, there's only about an inch of up travel left anyhow. It'll be simple to add the space I need without any real consequences anywhere else.
At the top of the picture is the bracket that originally held the straps for travel limitation. I'm thinking it'll be a good place to put a sway bar end link.
entry 225 - tags: rear axle, suspension, panhard | | |
|

 THE DIARY
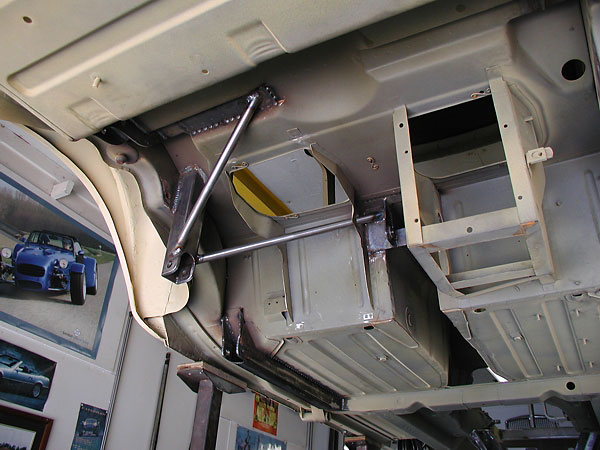