| LIFE OF A GT |
|
|
 | |  | March 4, 2010 - Driveshaft time.
I've managed to come up with a plan of attack to get me to the First Start of the engine. The exhaust is very high on the list as it's hot and big and determines where many other things go, but before I put the exhaust in I wanted to make sure the driveshaft wouldn't cause a clearance problem with the X pipe.
I'd forgotten to remove the driveshaft from the Camaro, so I jacked it up and pulled the shaft out. Easy, other than the remaining snowbanks and the joy of working on gravel. Don't worry Mom, I had some very large and thick boards under the jackstands to keep them stable!
After a lot of measuring and calculating and measuring again, I cut the driveshaft in half. This was a fairly painstaking cut, as I wanted to make sure it was completely square to the shaft itself. Once that was done, I spent some noisy quality time with the grinder removing the weld off the yoke for the pinion end so I could insert it back into the shortened shaft. More measuring with my new, shorter shaft and I cut off another 0.75". The yoke was an extremely tight fit into the tube, but I was able to coax it in eventually with the assistance of a precision 3lb sledgehammer and some careful placement.
Then I said "hang on a second", double-checked and removed the yoke again. I had it 90 degrees out of phase with the front one, they're supposed to be in phase. Out came the hammer again. When I test-fit the final result in the car, it was all sunshine and happiness in the shop. I'd been aiming for 0.75" to 1" of slip, and I ended up with 0.875". Right in the middle.
To avoid any nasty vibration problems down the road, I took the result to a local driveline shop for alignment, welding and balancing. He checked to see if the yokes were aligned, and was impressed to see that I'd managed to line them up perfectly. I think I was 0.5 degrees off, but apparently this is not a problem!
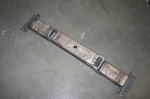
So what's in the picture? That's my transmission mount. As part of this exercise, I realized the transmission had to move over about 0.375". So I chopped it up and reassembled it to the correct dimensions. This makes it possible to install the driveshaft with the engine in the car! It'll also mean less modification to the transmission tunnel for the reverse lockout solenoid in the future. That's still coming up!
I forgot to take pictures of the driveshaft work, so it will make its public debut in a couple of days. Once I pick it up from the driveline shop, there's that step done!
entry 301 - tags: driveshaft, | | | 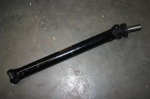 | March 15, 2010 - The finished driveshaft.
Okay, not a terribly exciting picture. But I'm pretty happy with how easy and inexpensive this was.
entry 308 - tags: driveshaft | | | 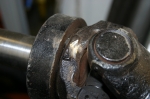 | August 24, 2010 - I found my driveshaft wouldn't give me the ability to get full droop out of my suspension.
That's not good! The problem was two little bosses on the yoke at the transmission end. A couple of minutes with the die grinder and now I have a full range of motion all the way around. The bosses weren't structural as far as I can tell.
One step further! I did a bit more painting with POR-15 under the car tonight and did the final connections on the gas tank, so it's almost time to stuff that axle under the car and call it done. Well, I know it'll come out again for various reasons. But maybe not for a long time.
entry 370 - tags: axle, driveshaft | | |
|

 THE DIARY