| LIFE OF A GT |
|
|
 | |  | November 21, 2008 - I cut the flare off the Rabbit fenders today.
Here's the left front fender on the right rear of the MG. Actually, it fits pretty well on either side, it was just easier to photograph this one! It's taped too far back in this picture, but it's close enough to give an idea. I think it'll work.
entry 74 - tags: body, flares | | | 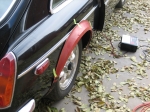 | November 21, 2008 - The flare still needs some trimming to make it fit on the car with the chrome strip, and I haven't decided if it needs to move up or down yet.
But the overall shape is encouraging. It looks like only slight forming will be needed in the rear.
The front's not quite as slick, but I have to pull the side marker light before testing much more.
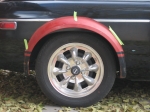
entry 75 - tags: body, flare | | | 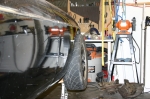 | December 4, 2008 - The tire does stick out a bit.
About as much as I'd expected based on my measurements, which is reassuring. A rough test fit shows that the Rabbit fender flare covers it almost perfectly. I'll pull one of the RA-1s off and test fit with that as well, but I have a good feeling about this - as long as I stick close to the stock +45 wheel offset, anyhow. I should probably make sure the +30 wheels with 205/50-15s fit, as that's what half of my race tires are.
The fairly radical camber is because I assembled this suspension out of spare parts and everything's just finger-tight. No attempt at alignment has been attempted!
entry 93 - tags: body, flares, wheels, tires, suspension | | | 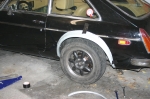 | December 1, 2010 - So, with the wheels all properly located in the wheel wells, it's time to remove some of the redneck and install the fender flares.
These flares are from an original Rabbit. I have a set off some front fenders cut off a junkyard car, and a set of rear "rust repair" panels that are brand new. After trying the various flares on different corners of the car, I decided the best fit in the back was to use the Rabbit rear flares on the same side they'd be fitted to the Rabbit.
First, I cut the flares off the rest of the patch panel. Then I played with placement to get it to sit just right over the wheel, and finally marked the position.
entry 491 - tags: flares, body | | | 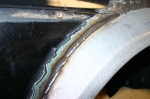 | December 1, 2010 - With the fender properly placed, I welded it on.
Lots of small spot welds to keep the heat under control. I'm really happy with how this turned out.
entry 494 - tags: fenders, flares, body | | | 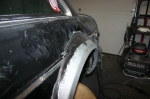 | December 1, 2010 - The solution to the gap was a patch panel.
It's shown here on the other side, because that's where I managed to get a better picture! I used card stock to work out the shape, cut a carefully shaped patch out of the leftover patch panel sheetmetal and welded it in. A bit more attention with the flapper wheel on the grinder and a bit of prep work and it'll look nice and smooth. It also makes the fender flares look much bigger than before!
entry 495 - tags: fender, flares, body | | | 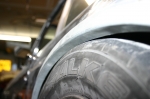 | December 1, 2010 - The new flares have a fairly big lip on the inside edge, typical for production cars.
Unfortunately, it means that my tires hit at full compression. So this lip has to go.
entry 496 - tags: body, flares, fenders | | | 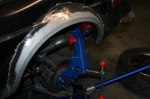 | December 1, 2010 - The solution?
A fender roller. Now, I often get accused of having access to special tools due to the fact that I work at Flyin' Miata. And I have to admit that this is one of those situations. Not that a fender roller is all that exotic, but it's easy to just grab the one off the shelf at work instead of having to borrow it from someone.
The low-tech way to do this would involve a baseball bat or jack handle, of course. I've done that in the past, so I think I've paid my dues!
entry 497 - tags: fenders, flares, body, fender roller | | | 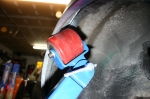 | December 1, 2010 - The roller is a pretty nice tool.
It allows you to slowly and carefully shape the fender, rolling that flat flange upwards so it gives more room without any visible changes. It's easier on an unpainted panel like this, of course, but I've made some fairly spectacular alterations to a couple of Miatas. In extreme cases, you can stretch the fender outwards for more space. I didn't have to do that here.
It might seem a little odd to build a custom fender and them immediately modify it like this, but it's part of getting the best fit.
So how's it look? Pictures will be forthcoming once I get the car out of the garage. Basically, the car's gone from looking pretty cool to just plain badass.
entry 498 - tags: fender roller, flares, fenders, body | | | 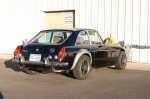 | December 2, 2010 - The final result!
I'll hit it with some black primer to protect the metal and make the shape blend into the body, but I'm really happy with the result.
entry 499 - tags: fenders, flares, body | | | 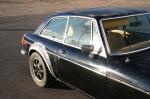 | December 2, 2010 - Another view from the front quarter.
Sorry about the exposure, the Colorado sun is pretty harsh for photography. I'll get some better ones later.
After some playing around yesterday, I decided that rear Rabbit flares (as seen on the rear of the MG) fit the front of the MG better than front Rabbit flares. Of course, I have a pair of junkyard front flares but no more rears. No worries, rabbitparts.com shipped me another set of patch panels yesterday and I should have them within a week. As a bonus, they're nice clean new metal like these instead of junkyard parts.
entry 500 - tags: body, fenders, flares | | | 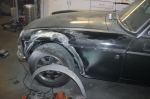 | December 16, 2010 - I've been out of town for over a week, so the MG hasn't seen much action.
But the whole time I was gone, I was thinking about the fact that my new front fenders should be arriving. Less than 24 hours after getting home, I had the new fenders cut up and was doing test fitting.
And here's where I ran into a problem. Cars taper. They tend to be wider in the middle than the ends. Both the Rabbit and the MGB are like this. So the flares are slightly tapered to match. In the rear, I used the rear fenders on their intended sides and so the taper worked out well. But in the front, I had to flip the fender pieces - from a rear Rabbit fender - to the other side if I wanted the taper to work with me. Unfortunately, no matter how I played with them, I just couldn't get them to sit well on the original wheel cutout.
By flipping them back again - left fender on the left side - I was able to get the shape I wanted with a delicious little curl where the flare melts into the body of the car. That's a great detail on the original Rabbit that you can see with the bumpers pulled. But it meant that the flare was tapered the wrong way. The front of the wheel is left more exposed and there's a bit more flare on the trailing edge. Still, I thought it worked pretty well, so that's what I've done. We'll see what I think when it's all painted up and finished.
I did do a lot more trimming on the metal to deal with this and to mold the flares to the body. I usually find tin snips to be terribly frustrating devices but this turned out to be their destined use. A nice change from noisy power tools that are always trying to fling incandescent metal into my eyeballs.
entry 505 - tags: fenders, flares, body | | | 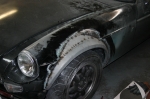 | December 16, 2010 - Just as in the rear, I had to add a filler piece to mate the flare to the body.
However, unlike the rear, it was trying to mate up to a fairly heavily curved fender. It looks a bit weird in the picture, but I think it'll look good when it's all painted.
I hope so anyhow.
entry 506 - tags: fenders, flares, body | | | 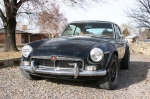 | December 17, 2010 - With both fenders welded up, I hit them with some black primer and brought the car out into the sun to see how it looked.
The answer: Pretty darn good. Obviously they're not finished yet, I only knocked down the high points on the welds so they wouldn't be too distracting.
The two front fenders came out slightly different, mostly in how the extra patch blends in. On the driver's side here, it's a straight line to the fender. On the passenger's side, there's a change in angle. I like the former, so I'll probably go back to the other side and add a bit more steel - I should be able make it work nicely.
The car looks pretty good now! Much less redneck.
entry 507 - tags: body, fenders, flares | | | 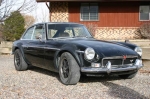 | December 17, 2010 - A view of the passenger's side.
You can't really see the difference in the front flares here. I think the car looks good - my concerns about the taper of the flares were a bit premature, as the final result blends in nicely. The rears still work a bit better in my opinion, but I'm pretty happy. There are so many ways this could have gone wrong.
Check out the strip down the side - it's just foil tape cut to width and stuck on to get a feel for how it will look. After the bodywork is finished and the car is painted, I'll cut down a set of stock stainless steel strips and make them fit.
entry 508 - tags: body, fenders, flares | | | 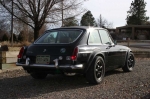 | December 17, 2010 - The best angle.
I want to spend a bit more time walking around the car and getting a feel for how it looks (and learning to photograph it well!), but I'm happy with this. It almost looks as if it should have come from the factory this way, which was my goal. I can see a few things I'd change if I did it again on the fronts (especially now that I've learned a few things about fitting the metal) but that's just my reaction after spending a few days working on them. It's like the stripes on the Targa Miata - I'm not happy with how they flow on one corner or around the rear taillights, but nobody else has ever noticed.
To celebrate, we used the car for a bit of running around town including some grocery shopping. Naturally, my freshly-adjusted latch on the tailgate decided to get ornery and refused to open, so we had to load all the groceries in through the front doors. The car's still fairly loud, but I think I managed to solve the major vibration problem. We'll see when I get it on the interstate. Still have to fix that bit of stiction in the steering though...
entry 509 - tags: fenders, flares, body | | | 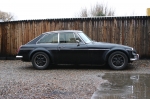 | December 20, 2010 - I was asked for a side shot of the flares, showing how they fit over the wheels.
And here it is.
The Lucas bullet connector between the new wiring and the fuel pump has been replaced. The culprit? I don't know. I also discovered that I never tightened down some of the connections on the main power bus, so it's possible that could be a culprit.
entry 511 - tags: body, fender, flares | | | 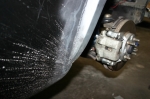 | January 18, 2011 - The flares look pretty good, but there's one line that bothers me.
The trailing edge of the front fenders doesn't blend into the body as well as I'd like. It's not something you'd notice unless you spend hours looking at the car and working on small areas of it, but they don't look factory.
I do have a couple of stubs that were cut off the leading edge of these flares as I was building them. They have a better shape.
entry 534 - tags: body, fender, flares | | | 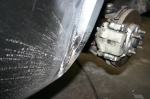 | January 18, 2011 - Much better!
The flares now blend into the body perfectly, even following a curve at the bottom of the fender when viewed from the side. I'm really happy with how this turned out, they're even better in person.
It's unlikely anyone would have noticed unless I'd pointed it out, but now I'm satisfied.
entry 535 - tags: body, fender, flares | | | 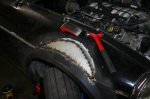 | February 5, 2011 - The right front flare has been bothering me.
It's at a slightly different angle than the left side. Now, asymmetry isn't a big deal. But the other one works better! So I decided to try to fix it. I cut out my extension piece that molds the flare into the fender, reshaped the flare and cut a new one. After quite a bit of careful positioning, trimming, hammering and prying...it somehow shifted back into the original shape. Well, not exactly. But not quite what I wanted.
Argh. I can use filler to shape it the same as the other side, but it would be about 1/4" thick in the deepest point. I'll see what I can do with yet more steel.
entry 550 - tags: flares, body | | | 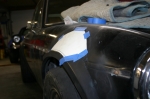 | February 6, 2011 - So, how hard would it be to reshape that front fender flare?
Well, here's what the patch would look like. Can I meld that in smoothly? I don't know. I'll give it a shot. But first, I need to buy some more steel!
entry 554 - tags: body, flares, fender | | | 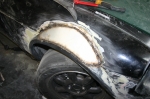 | April 5, 2011 - I played around with shaping the right front fender flare using body filler, but I just couldn't get a good shape without resorting to 1/4" or more of the stuff.
And that's too much. So I cut it up again and added a new metal patch. This is my third attempt on this side to get a shape I want, and I think this one's going to be the right one. Even without any fine-tuning, it's just about bang-on and should blend in nicely.
entry 562 - tags: flares, body | | | 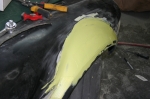 | April 5, 2011 - After the welds were ground down, I put a skim coat of filler over that troublesome right front.
Much better. The profile of the flare is nice and smooth, without a halfway "step" that I had before. This coat is a little on the thick side but it's easier to sand down than build it up again later. Most of the filler will go away and I expect to see big patches of bare metal when I'm done. I feel good about this.
entry 563 - tags: flares, body | | | 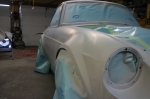 | June 15, 2011 - Here's a look at the shape of the front flares.
I'm happy with how they turned out, especially this right front that gave me so much trouble.
The ragged line in front of the flare will be covered by the stainless trim along the side of the car, so just ignore it.
entry 573 - tags: body, primer, flares | | |  | June 15, 2011 - Here's an example of how the primer has helped with the shape of the car.
This is the transition from the side of the car to the fender flare in the rear. The different colors are different layers, with the yellow body filler on the bottom. In order to get that guide coat fully off, I had to sand down further in one section of the flare. The result now has a smoother shape to it, cleaning up a bit of a step in the angle that was invisible before. There's still a bit of guide coat visible at the right of the picture, I'll get it later. You can see the amount of material that's been sanded off at the left - getting this car dust-free again for the color coat may be a challenge.
The primer coat is proving to be fantastic at finalizing the shape of the car. Sections that were just a little rough are cleaning up and everything is flowing together really well. I'm really happy with it. It's also moving quickly because the primer sands so well. I'm using both 240 grit paper and some fine sanding blocks for this step. The foam sanding blocks are great for dealing with those compound curves, while the paper on longer blocks help make sure everything's flat.
entry 575 - tags: primer, body, flares | | | 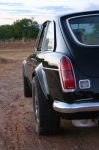 | June 20, 2011 - A closer look at how the flares fit with the body.
I could not be happier with them, especially the rears.
entry 593 - tags: body, flares | | | 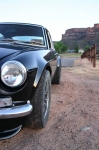 | June 20, 2011 - And here's the view from the front.
The fronts are definitely a beefier design, and I was a bit worried they wouldn't suit the car. But they do, echoing the round shape of the hood and fenders.
Yes, I know I need to change out that fastener behind the bumper.
entry 594 - tags: body, flares | | |
|

 THE DIARY