| LIFE OF A GT |
|
|
 | | November 8, 2008 - After some rough sketches and much thinking, I'm leaning away from narrowing the Miata suspension.
The roll centers won't be as well controlled as I thought - thanks to Jensenman on the GRM forums for making me take another look at this.
Luckily, there's an alternative. The fender flares from a Dodge Omni can be grafted on to the MG bodyshell, adding a bit over 2" per side. That should be almost perfect. Time to start hunting Omnis, or see if I can find another car that would make a good donor.
entry 68 - tags: suspension, body | | | .jpg) | November 11, 2008 - A lesser-known alternative to the Omni flares is ones from a Mk1 Golf - aka Rabbit.
There's not as much information about them out there, but they have a better shape in my opinion. I'm going to pick up some Rabbit fenders that are in a junkyard locally and see for myself. I like the hood louvers on this car as well, I suspect something like that will be necessary to keep the temperatures under control.
I think the best order of operations is to strip the MG down and start figuring how to mount the suspension. That'll tell me just how wide the fenders need to be. I'm also going to have access to an LS3 engine and T56 trans going into a Miata, and I'll make the measurements I need to determine just what needs to be done to the chassis and where the engine will sit.
In the meantime, the Camaro will be registered and driven to make sure there are no foibles in the drivetrain prior to installation. I think it's going to be difficult to resist stress-testing the tires on a regular basis, it's that kind of car...
entry 70 - tags: body, plans | | | 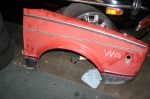 | November 15, 2008 - I stopped by a local scrapyard today and picked up a pair of fenders.
They're from a square-headlight Rabbit - one of the ones made in Pennsylvania. We tried to pull one off a German-built cabrio but it was built with much more enthusiasm and far more seam sealer so we could not remove it without damage. One nice thing about living in western Colorado is that the cars are almost rust-free.
I'll cut out the flare shortly and get an idea how it sits on the car. The rears looked as if they'd really work nicely on the back of the MG, but the yard wants $100 per side to torch them out "due to the cost of oxygen and acetelyne". I know it's a pain in the butt to do something like that, so just tell me it's a PITA factor. Don't make up fictional costs! I'll see if the fronts can also be used on the back before I go back to negotiate. The good thing is that the yard had a half-dozen potential donors so I have a good selection - including a pickup! Most of them are two-door hatchbacks or convertibles which seems to have the best shape.
entry 71 - tags: body | | | 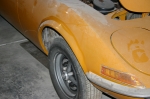 | November 15, 2008 - While walking past the Opel GTs parked in the shop at work, I took a closer look at the shape of the fenders.
This might work. They're nice and round without the flattened edge used on the Golf. And there's a good donor in the shop as well - a parts car that is destined to be chopped into pieces.
Hmm..
entry 72 - tags: body | | | 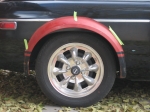 | November 21, 2008 - I cut the flare off the Rabbit fenders today.
Here's the left front fender on the right rear of the MG. Actually, it fits pretty well on either side, it was just easier to photograph this one! It's taped too far back in this picture, but it's close enough to give an idea. I think it'll work.
entry 74 - tags: body, flares | | | 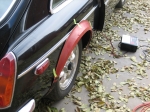 | November 21, 2008 - The flare still needs some trimming to make it fit on the car with the chrome strip, and I haven't decided if it needs to move up or down yet.
But the overall shape is encouraging. It looks like only slight forming will be needed in the rear.
The front's not quite as slick, but I have to pull the side marker light before testing much more.
entry 75 - tags: body, flare | | | 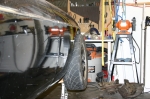 | December 4, 2008 - The tire does stick out a bit.
About as much as I'd expected based on my measurements, which is reassuring. A rough test fit shows that the Rabbit fender flare covers it almost perfectly. I'll pull one of the RA-1s off and test fit with that as well, but I have a good feeling about this - as long as I stick close to the stock +45 wheel offset, anyhow. I should probably make sure the +30 wheels with 205/50-15s fit, as that's what half of my race tires are.
The fairly radical camber is because I assembled this suspension out of spare parts and everything's just finger-tight. No attempt at alignment has been attempted!
entry 93 - tags: body, flares, wheels, tires, suspension | | |  | December 4, 2008 - Okay, I should stay away from that combination.
A +30 offset wheel with a 205/50-15 sticks out 3/4" further from the body. As the math says it should - there should be 20mm more when compared to a 195/60-14 on a +45 wheel. The flares don't quite cover them with room for wheel movement. That's okay, I can run a greater offset. We'll see exactly where the flares end up when they're welded in.
I pulled the rear axle off as well. There's a lot of room under there now!
entry 94 - tags: body, wheels, tires | | | 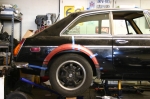 | October 26, 2009 - I stuffed the rear axle under the car and lifted it into place, just to see how everything fits.
This was a reward to myself at the end of the day, so I haven't actually crawled under to discover what's liable to give me fits yet. I know there will be something. I realized today that the battery I was planning to use - a big burly Optima - won't fit in an unmodified battery box. So I'll have to do something clever down there. Anyhow...
The wheels look good! I'm very happy with that. There's loads of room inside, and I'll probably stick a coilover in there so they don't hang down as low as they do on Masters' car. These weedy little 195/60-14 tires will fit quite nicely under the Rabbit flares too. If I do decide to go fatter - say, a 225/45-15 on a 15x8, which would be a very logical thing to do - I'm going to have fender clearance problems. Maybe I'll just use very good tires and acknowledge the car will be woefully under-tired. I should be able to run a 205/50-15 without trouble if I'm clever with my offset choices. Still, these are +45mm wheels. You don't tend to see too many that are higher than that. I could always get the housing and axles shortened if it comes to that. For now, we'll build for a 205 tire.
You can see here how much trimming the stock fender will need here.
entry 200 - tags: wheels, body, tires | | | 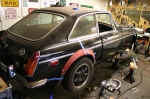 | October 26, 2009 - A 3/4 view of the wheel/tire/fender mockup.
I really like the way this sits. Not so sure about the color scheme though. It's also really tempting to see what I can do about a set of box flares. But that would be anachronistic.
entry 201 - tags: body, wheels | | | January 7, 2010 - Dumb.
Remember my trip to the junkyard to pick up some Rabbit fenders so I could scavenge the arches? At the time, I thought the rears might actually work pretty well but the yard wanted a pile of money for them.
Well, it turns out you can get patch panels to repair Rabbits. New front fenders are available from JC Whitney and others, but even better Rabbitparts.com carries a rear arch repair panel that's exactly what I need. They're only $48 each and brand new steel. I'm going to pick up a pair to see how they work, and I may end up ordering another pair to replace what I have if the shape looks a bit better.
Yeesh. Never thought to check before.
entry 249 - tags: body | | |  | January 17, 2010 - The new fender flares have arrived.
They're going to be much, much easier to work with than the originals. It's interesting to see just how similar the shapes are front and rear though.
entry 254 - tags: fenders, body | | | 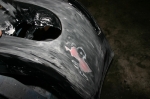 | June 28, 2010 - I haven't been working on the MG of late, but I've been acquiring more skills that will come in handy.
I've had to do a bit of bodywork on another car and it's forcing me to develop the ability to lay down paint nicely and also develop more patience! The car in question is a deep, deep black that I'm going to use on the MG, so it's teaching me just how unforgiving black can be.
Once this is resprayed to an acceptable finish, I'm going to dive back into the MG. But I don't think it's going to be driving in a month and a half, an unofficial target I'd set for myself. Not unless I really start to focus and maybe take a few days off work. Sigh.
entry 352 - tags: body, paint | | | 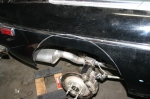 | October 31, 2010 - I was doing some testing on bumpstop length, and decided it would be a good idea to mark how much fender cutting will be required.
A piece of string with a loop at each end, a bolt to act as a center pivot and a silver Sharpie and voila! Here's the cut line. The inside of the fender actually has a lot more room, as I'm using the factory MG bumpstop and smaller diameter tires. But I pushed them outboard, of course.
entry 416 - tags: body, fenders | | | 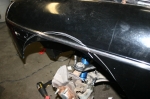 | October 31, 2010 - Here's the cut line for the front fender.
This one's a bit more complex because the wheel has to move, but I'll cut this much first and then play with wheel angles.
entry 417 - tags: body, fenders | | | 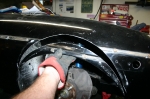 | November 3, 2010 - Time to make some room in the fenders!
For some reason, this cut filled me with a certain amount of trepidation. It's not like I'm dealing with a pristine automobile here, it's undergone massive reconstructive surgery. But this is the first cut that's visible from outside.
Sure didn't take long. Both front fenders are cut now.
entry 421 - tags: fenders, body | | | 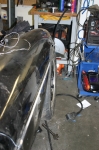 | November 3, 2010 - Here's a peek at the front wheel at full compression.
I have clearance for full lock and full bump, so that's good. It looks pretty cool like this. In fact, it almost looks as if I could have just stretched the fenders slightly. Not really, but it looks that way.
entry 422 - tags: body, fenders | | | 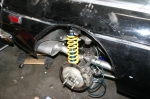 | November 7, 2010 - With the brakes all plumbed in, it's time to bleed them.
Unfortunately, I still have a mismatch of front brake pads (1994 Miata), brake rotors (1994 Miata) and caliper brackets (1990 Miata, which uses smaller brakes). I have a set of the later brackets on the way, but with Janel available to help me bleed I wanted to do something. Well, the Seven was just sitting there with an engine problem awaiting my attentions, and it uses the 1990 size brakes. So I grabbed the rotors and pads from that car and voila! Front brakes.
I've also cut the rear arches away to clear the tires on full bump. There's a double skin to the body here so some black duct tape was used to seal it up until I weld in an insert to join the gap. It was gratifying to see how clean the metal inside that cut section is. That's a rust spot for the cars, and mine was pristine inside. Was.
Time to bleed the brakes! All the suspension pivots have been torqued up and the springs are in place. Does it seem as if I'm working towards something here? Perhaps.
entry 427 - tags: brakes, suspension, body, fenders | | | 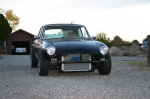 | November 7, 2010 - Without any grille on the front or any lower bodywork, you can really see how ridiculously oversize the radiator is!
It'll all be covered once the MG Special Tuning front air dam is installed, and the chrome on the bumper and grille will finish off the car well. I may fog the radiator with black paint to make it a bit more subtle.
It doesn't look much like an MG here, but it does still somehow manage to look British.
entry 432 - tags: first drive, radiator, body | | | 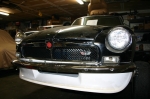 | November 13, 2010 - I also spent quite a bit of time goofing around with the Special Tuning air dam.
It's almost like I'm trying to adapt a piece designed for a different car to an MG. Almost. Anyhow, I've drilled a bunch of holes and hung it in approximately the correct location. The bumper's on quite crooked here to really finish off the appearance.
I'll paint it black at some point and when the car is finished, spend some time evaluating the look. I know it'll help at high speed, but I'm not really worried about front-end lift over 100 mph.
Sharp eyes may notice the Nova badge zip-tied to the grille in the same approximate location that MG put the V8 badge on some cars. I like it.
entry 448 - tags: body, spoiler, bumper, badge | | | 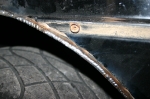 | November 28, 2010 - The rear fenders have a double wall on them.
When I cut out the fenders for the new wheels, this left a gap of up to 3/4" or so. I had it covered with black duct tape for the early drives, but that was a poor solution at best. Since I didn't really want to fill the inner fender with road debris, it was time to do something better.
I used the section of cut out fender to trace out the shape required, cut it out of 1/8" steel and bent it into shape. It didn't take long to fit it into place, and I'm quite happy with the result. A shot of black paint finished it off. This section will eventually be hidden under the new fender flares.
I'm feeling a lot better about the upcoming metalwork. This went pretty well - the welds behaved themselves nicely.
entry 485 - tags: body | | | 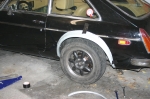 | December 1, 2010 - So, with the wheels all properly located in the wheel wells, it's time to remove some of the redneck and install the fender flares.
These flares are from an original Rabbit. I have a set off some front fenders cut off a junkyard car, and a set of rear "rust repair" panels that are brand new. After trying the various flares on different corners of the car, I decided the best fit in the back was to use the Rabbit rear flares on the same side they'd be fitted to the Rabbit.
First, I cut the flares off the rest of the patch panel. Then I played with placement to get it to sit just right over the wheel, and finally marked the position.
entry 491 - tags: flares, body | | |  | December 1, 2010 - After the paint was removed from the fender area, the Rabbit part was tack-welded on.
I then reinstalled the wheel, dropped the car back down and double-checked placement.
Just look at how that fender fits the MG body. It's perfect.
entry 492 - tags: fender, body | | | 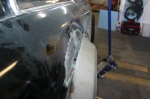 | December 1, 2010 - There's one problem with the flares, though.
They sit high enough on the body that they cross over the line where the stainless steel strakes run. This leaves a gap at the top of the flare where the body steps inwards. These fenders have a little curve where they meet up with the body, so before installing them I used a body hammer to remove the curve and flatten the profile of the flare in this area.
I am mounting these flares higher on the body than I've seen on another car - the only other car I've seen with the Rabbit flares. It could be that my ride height is lower, but aesthetically I'm happy with the placement.
entry 493 - tags: body, fender | | | 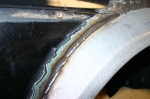 | December 1, 2010 - With the fender properly placed, I welded it on.
Lots of small spot welds to keep the heat under control. I'm really happy with how this turned out.
entry 494 - tags: fenders, flares, body | | | 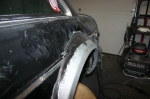 | December 1, 2010 - The solution to the gap was a patch panel.
It's shown here on the other side, because that's where I managed to get a better picture! I used card stock to work out the shape, cut a carefully shaped patch out of the leftover patch panel sheetmetal and welded it in. A bit more attention with the flapper wheel on the grinder and a bit of prep work and it'll look nice and smooth. It also makes the fender flares look much bigger than before!
entry 495 - tags: fender, flares, body | | | 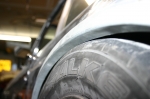 | December 1, 2010 - The new flares have a fairly big lip on the inside edge, typical for production cars.
Unfortunately, it means that my tires hit at full compression. So this lip has to go.
entry 496 - tags: body, flares, fenders | | | 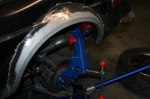 | December 1, 2010 - The solution?
A fender roller. Now, I often get accused of having access to special tools due to the fact that I work at Flyin' Miata. And I have to admit that this is one of those situations. Not that a fender roller is all that exotic, but it's easy to just grab the one off the shelf at work instead of having to borrow it from someone.
The low-tech way to do this would involve a baseball bat or jack handle, of course. I've done that in the past, so I think I've paid my dues!
entry 497 - tags: fenders, flares, body, fender roller | | | 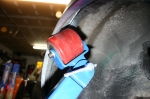 | December 1, 2010 - The roller is a pretty nice tool.
It allows you to slowly and carefully shape the fender, rolling that flat flange upwards so it gives more room without any visible changes. It's easier on an unpainted panel like this, of course, but I've made some fairly spectacular alterations to a couple of Miatas. In extreme cases, you can stretch the fender outwards for more space. I didn't have to do that here.
It might seem a little odd to build a custom fender and them immediately modify it like this, but it's part of getting the best fit.
So how's it look? Pictures will be forthcoming once I get the car out of the garage. Basically, the car's gone from looking pretty cool to just plain badass.
entry 498 - tags: fender roller, flares, fenders, body | | | 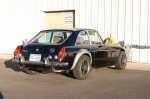 | December 2, 2010 - The final result!
I'll hit it with some black primer to protect the metal and make the shape blend into the body, but I'm really happy with the result.
entry 499 - tags: fenders, flares, body | | | 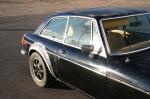 | December 2, 2010 - Another view from the front quarter.
Sorry about the exposure, the Colorado sun is pretty harsh for photography. I'll get some better ones later.
After some playing around yesterday, I decided that rear Rabbit flares (as seen on the rear of the MG) fit the front of the MG better than front Rabbit flares. Of course, I have a pair of junkyard front flares but no more rears. No worries, rabbitparts.com shipped me another set of patch panels yesterday and I should have them within a week. As a bonus, they're nice clean new metal like these instead of junkyard parts.
entry 500 - tags: body, fenders, flares | | | 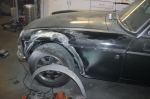 | December 16, 2010 - I've been out of town for over a week, so the MG hasn't seen much action.
But the whole time I was gone, I was thinking about the fact that my new front fenders should be arriving. Less than 24 hours after getting home, I had the new fenders cut up and was doing test fitting.
And here's where I ran into a problem. Cars taper. They tend to be wider in the middle than the ends. Both the Rabbit and the MGB are like this. So the flares are slightly tapered to match. In the rear, I used the rear fenders on their intended sides and so the taper worked out well. But in the front, I had to flip the fender pieces - from a rear Rabbit fender - to the other side if I wanted the taper to work with me. Unfortunately, no matter how I played with them, I just couldn't get them to sit well on the original wheel cutout.
By flipping them back again - left fender on the left side - I was able to get the shape I wanted with a delicious little curl where the flare melts into the body of the car. That's a great detail on the original Rabbit that you can see with the bumpers pulled. But it meant that the flare was tapered the wrong way. The front of the wheel is left more exposed and there's a bit more flare on the trailing edge. Still, I thought it worked pretty well, so that's what I've done. We'll see what I think when it's all painted up and finished.
I did do a lot more trimming on the metal to deal with this and to mold the flares to the body. I usually find tin snips to be terribly frustrating devices but this turned out to be their destined use. A nice change from noisy power tools that are always trying to fling incandescent metal into my eyeballs.
entry 505 - tags: fenders, flares, body | | | 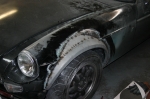 | December 16, 2010 - Just as in the rear, I had to add a filler piece to mate the flare to the body.
However, unlike the rear, it was trying to mate up to a fairly heavily curved fender. It looks a bit weird in the picture, but I think it'll look good when it's all painted.
I hope so anyhow.
entry 506 - tags: fenders, flares, body | | | 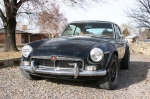 | December 17, 2010 - With both fenders welded up, I hit them with some black primer and brought the car out into the sun to see how it looked.
The answer: Pretty darn good. Obviously they're not finished yet, I only knocked down the high points on the welds so they wouldn't be too distracting.
The two front fenders came out slightly different, mostly in how the extra patch blends in. On the driver's side here, it's a straight line to the fender. On the passenger's side, there's a change in angle. I like the former, so I'll probably go back to the other side and add a bit more steel - I should be able make it work nicely.
The car looks pretty good now! Much less redneck.
entry 507 - tags: body, fenders, flares | | | 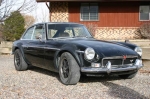 | December 17, 2010 - A view of the passenger's side.
You can't really see the difference in the front flares here. I think the car looks good - my concerns about the taper of the flares were a bit premature, as the final result blends in nicely. The rears still work a bit better in my opinion, but I'm pretty happy. There are so many ways this could have gone wrong.
Check out the strip down the side - it's just foil tape cut to width and stuck on to get a feel for how it will look. After the bodywork is finished and the car is painted, I'll cut down a set of stock stainless steel strips and make them fit.
entry 508 - tags: body, fenders, flares | | | 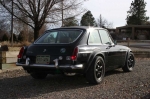 | December 17, 2010 - The best angle.
I want to spend a bit more time walking around the car and getting a feel for how it looks (and learning to photograph it well!), but I'm happy with this. It almost looks as if it should have come from the factory this way, which was my goal. I can see a few things I'd change if I did it again on the fronts (especially now that I've learned a few things about fitting the metal) but that's just my reaction after spending a few days working on them. It's like the stripes on the Targa Miata - I'm not happy with how they flow on one corner or around the rear taillights, but nobody else has ever noticed.
To celebrate, we used the car for a bit of running around town including some grocery shopping. Naturally, my freshly-adjusted latch on the tailgate decided to get ornery and refused to open, so we had to load all the groceries in through the front doors. The car's still fairly loud, but I think I managed to solve the major vibration problem. We'll see when I get it on the interstate. Still have to fix that bit of stiction in the steering though...
entry 509 - tags: fenders, flares, body | | | 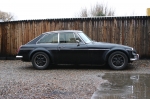 | December 20, 2010 - I was asked for a side shot of the flares, showing how they fit over the wheels.
And here it is.
The Lucas bullet connector between the new wiring and the fuel pump has been replaced. The culprit? I don't know. I also discovered that I never tightened down some of the connections on the main power bus, so it's possible that could be a culprit.
entry 511 - tags: body, fender, flares | | | 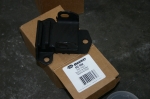 | January 14, 2011 - I spent part of the day today talking paint and bodywork with the local paint shop.
Hightower supply has been very helpful to me. I came home with some new primer and a big bucket of body filler to make those fender flares all pretty.
I also want to try some rubber motor mounts in the car. I think some of my noise is vibration coming through the mounts. I put some competition motor mounts on Janel's street Miata and got a similar noise. Now, the mounts I used were generic small block Chevy (pre-LS1) mounts from Energy Suspension. I went to NAPA, opened up the Big Book Of Motor Mounts, and spotted this on the first page. I don't know what the application is - probably every V8 from General Motors from 1960 to 1997 - but I think that's it. I just hope the softer mounts don't let the exhaust and other bits and pieces lean up against each other.
entry 531 - tags: motor mounts, bodywork, paint | | | 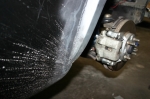 | January 18, 2011 - The flares look pretty good, but there's one line that bothers me.
The trailing edge of the front fenders doesn't blend into the body as well as I'd like. It's not something you'd notice unless you spend hours looking at the car and working on small areas of it, but they don't look factory.
I do have a couple of stubs that were cut off the leading edge of these flares as I was building them. They have a better shape.
entry 534 - tags: body, fender, flares | | | 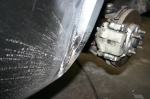 | January 18, 2011 - Much better!
The flares now blend into the body perfectly, even following a curve at the bottom of the fender when viewed from the side. I'm really happy with how this turned out, they're even better in person.
It's unlikely anyone would have noticed unless I'd pointed it out, but now I'm satisfied.
entry 535 - tags: body, fender, flares | | |  | January 26, 2011 - One last job before I start in with the body filler.
I've decided to remove the side marker lights from the car so it looks like the earliest GTs. I've been driving around with black duct tape covering the holes, but something more permanent is required. Step one, clean up the edge of the holes.
entry 541 - tags: bodywork | | | 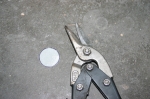 | January 26, 2011 - Step two: cut out a patch.
I used the leftover bits of metal from the Rabbit flares. First I used the hole as a template to trace out the shape of the piece needed, then cut it with a set of snips. Much fine-tuning followed to get the perfect shape.
entry 542 - tags: bodywork | | | 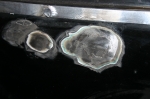 | January 26, 2011 - Then the patches were carefully welded into place.
Of course, none of the holes in the car (I also patched the antenna hole) were on a flat panel. So I welded in one or two sides, then reshaped the patch with a body hammer to make it conform. It's still going to need body filler of course - especially on this side, where there's a fairly thick skim layer on the panels laid down before the black paint - but that will be kept to a minimum.
Now, on to the fenders!
entry 543 - tags: bodywork | | | 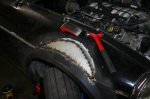 | February 5, 2011 - The right front flare has been bothering me.
It's at a slightly different angle than the left side. Now, asymmetry isn't a big deal. But the other one works better! So I decided to try to fix it. I cut out my extension piece that molds the flare into the fender, reshaped the flare and cut a new one. After quite a bit of careful positioning, trimming, hammering and prying...it somehow shifted back into the original shape. Well, not exactly. But not quite what I wanted.
Argh. I can use filler to shape it the same as the other side, but it would be about 1/4" thick in the deepest point. I'll see what I can do with yet more steel.
entry 550 - tags: flares, body | | | 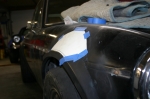 | February 6, 2011 - So, how hard would it be to reshape that front fender flare?
Well, here's what the patch would look like. Can I meld that in smoothly? I don't know. I'll give it a shot. But first, I need to buy some more steel!
entry 554 - tags: body, flares, fender | | | February 20, 2011 - The other coolant sender is better, but not right.
It reads right between N and H during normal operating temperatures. I'll deal with that soon. Right now, I'm spending most of my time doing the body prep on the Miata. It'll get painted next week, then I'll start on the bodywork for the MG.
entry 557 - tags: body, gauges | | | 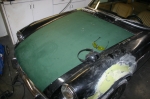 | March 13, 2011 - The Miata is painted, so it's time to turn to the black beast.
I learned a lot doing that car. The experience from it will definitely help with the MG.
So this means it's time for bodywork. I started with the left flares, mostly because they're most easily accessible with the MG in its current parking space. This is going to take a while to get the shape just right, that's for sure. But it's kind of relaxing work.
Why did the hood turn green? Because the black one didn't fit right at the front corners. I was actually afraid the nose of the car had sagged when it was all cut up. But just to be sure before I started taking extreme measures to fix it, I pulled the hood off the green parts car. Problem solved. And laying the black hood on the parts car showed the same fitment problem. So it's not the car. The weird thing is that, looking at old pictures of the car, the hood used to fit perfectly. I'm wondering if it got bent when there were a couple of protruding bolts on the new grille. I wouldn't have forced it hard enough for that, but it's the only explanation I can come up with. Still, I have a good replacement so there's no concern.
entry 558 - tags: hood, bodywork | | | 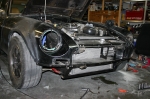 | March 15, 2011 - The car getting a lot uglier in a hurry.
Since I don't know for sure yet if I'll use the Special Tuning airdam - the nose does look a little unbalanced right now - I'm going to paint both it and the lower section together. And of course, all the lights and chrome has to come off. Poor thing.
I also removed the headers so they could be milled flat. I figure the car won't be going anywhere for a while, and the flanges are a bit warped from the welding heat. I can remove them without even lifting the car! Try that on a Camaro. Or a Miata or stock MG, for that matter. I got lucky.
entry 559 - tags: header, bodywork | | | 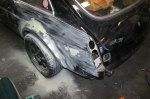 | March 23, 2011 - Sanding, sanding, sanding.
I've stripped all of the badges, bumpers, lights and handles off the outside of the car. I may still see if I can get the trim off the windows etc, but the car's looking pretty barren right now. And I'm sanding.
It's pretty relaxing work. The flares are blending well into the body but I know the upcoming shiny black paint is going to highlight even the smallest imperfection. I'm also finding the body's not quite flat at the moment, so I'm trying to sort that out as much as I can. Apply filler, sand filler. Apply filler, sand filler. There is much sanding in my future.
entry 560 - tags: sanding, body | | | 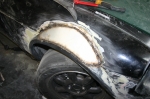 | April 5, 2011 - I played around with shaping the right front fender flare using body filler, but I just couldn't get a good shape without resorting to 1/4" or more of the stuff.
And that's too much. So I cut it up again and added a new metal patch. This is my third attempt on this side to get a shape I want, and I think this one's going to be the right one. Even without any fine-tuning, it's just about bang-on and should blend in nicely.
entry 562 - tags: flares, body | | | 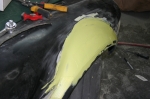 | April 5, 2011 - After the welds were ground down, I put a skim coat of filler over that troublesome right front.
Much better. The profile of the flare is nice and smooth, without a halfway "step" that I had before. This coat is a little on the thick side but it's easier to sand down than build it up again later. Most of the filler will go away and I expect to see big patches of bare metal when I'm done. I feel good about this.
entry 563 - tags: flares, body | | | 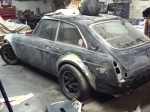 | May 14, 2011 - Let's hear it for power tools!
My air-powered sanders have made a big difference, and the car is looking particularly disreputable but feeling much smoother now. The flares are almost complete and I'm just working on other small spots of the car now. Progress!
entry 565 - tags: Bodywork | | | 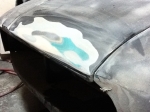 | May 14, 2011 - You can see how much paint is on this poor car.
The original aqua is obvious here, as is the skim coat of filler that covers the whole car under the black. Someone put some real effort into that black paint job, I have to admit.
In this shot, I'm feathering the edges of the paint to get it as smooth as I can and fix some small shaping problems. Sorry about the quality of the pictures, I left my good camera at work so I decided to set the website up to take uploads from an iPad or iPhone. The camera on the former is nothing to get excited about, but it beats no picture at all.
entry 566 - tags: bodywork | | | 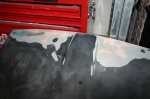 | June 13, 2011 - Sanding sanding sanding.
I'm pretty much done with sanding, I'm happy to report. Although I have discovered some truly spectacular amounts of Bondo on some parts of this car. Not bent parts, but it appears the person who painted the car black put a thick skim coat over the whole car and then shaped it. Luckily, almost all of it is in good shape other than this crack on the hood.
Every time you read an article in Hot Rod about "perfect paint", they always show pictures of sanding on a nice big old American car with acres of flat surfaces. I don't think there's a single flat surface on the MG, and most of it is compound curves. It's been quite a lot of work getting the shape just right. Especially those new flares. But I'm calling it done. I'm happy with their shape now.
entry 567 - tags: body, sanding | | |  | June 13, 2011 - Before I shoot primer, I'm doing the last bit of body prep.
Almost forgot about this - the new exhaust pipe on the right doesn't sit in the same spot as the original. So I welded in a patch. I'll now give it a coat of filler and then sand it smooth. Luckily, it's basically hidden when I'm done so it won't take days of careful shaping.
Check out those spot weld marks hiding behind the stock bumper! They look pretty random.
entry 568 - tags: body | | | 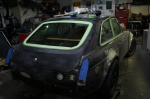 | June 13, 2011 - While I waited for the last coat of filler to dry on the exhaust cutout, I started masking from the back of the car.
Maybe it's because I grew up in the 80s, but I'm digging this neon green and bright blue on black color scheme.
I've gotta get out of the garage.
Always use good tape when masking. It's awful to discover you had a leak and now there's black paint all over your stainless steel trim, for example. I bought a couple of rolls from Harbor Freight and it's worthless. Real painter tape makes all the difference.
entry 569 - tags: body, masking | | | 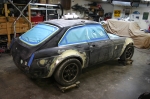 | June 15, 2011 - More masking.
I've decided I really like the angle on this shot!
entry 570 - tags: body, masking | | | 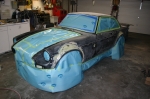 | June 15, 2011 - Okay, the car's all masked.
The paint's been wiped down with grease remover. It's time to make it all the same color.
entry 571 - tags: body, masking, paint | | | 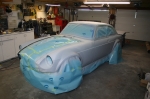 | June 15, 2011 - And voila!
A coat of primer. Unfortunately, only one coat instead of 2-4 because I ran out. It's amazing how much better it looks already. I'll go pick up some more primer so I can give it a bit more. Some of it is still wet in the picture, thus the darker area around the front wheel.
Having the whole car one color makes it obvious where I've done well and done badly on my shaping. On the passenger's side, it looks quite good and I'm happy with that. The driver's rear needs some more work, mostly because I'm dealing with the skim coat put on by the previous painter. So I'll do some quick touch-up there and try again.
Much more sanding to come - but this will be much quicker than before.
entry 572 - tags: body, primer, paint | | | 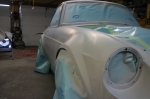 | June 15, 2011 - Here's a look at the shape of the front flares.
I'm happy with how they turned out, especially this right front that gave me so much trouble.
The ragged line in front of the flare will be covered by the stainless trim along the side of the car, so just ignore it.
entry 573 - tags: body, primer, flares | | | 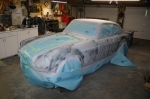 | June 15, 2011 - Some vandal defaced my paint job!
Oh, no, wait. That was me. I shot a thin coat of black primer over the white as a guide coat.
Well, first I gave the car a couple of extra coats of the white primer to build up the coat. Then the guide coat. Now I sand the guide coat off. The purpose of this is that it will highlight any low spots in the paint as the high points sand to white and the low spots stay black. Thus allowing me to find and address problems that will show up in the shiny final paint.
I should point out that this isn't a "how to paint a car" tutorial. I've done a couple of cars in the past, but I'm still very much an amateur. In fact, this is the first time I've done a primer coat like this.
Luckily, primer is made to be sanded. So this is actually a very satisfying job.
entry 574 - tags: primer, paint, body | | | 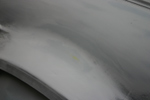 | June 15, 2011 - Here's an example of how the primer has helped with the shape of the car.
This is the transition from the side of the car to the fender flare in the rear. The different colors are different layers, with the yellow body filler on the bottom. In order to get that guide coat fully off, I had to sand down further in one section of the flare. The result now has a smoother shape to it, cleaning up a bit of a step in the angle that was invisible before. There's still a bit of guide coat visible at the right of the picture, I'll get it later. You can see the amount of material that's been sanded off at the left - getting this car dust-free again for the color coat may be a challenge.
The primer coat is proving to be fantastic at finalizing the shape of the car. Sections that were just a little rough are cleaning up and everything is flowing together really well. I'm really happy with it. It's also moving quickly because the primer sands so well. I'm using both 240 grit paper and some fine sanding blocks for this step. The foam sanding blocks are great for dealing with those compound curves, while the paper on longer blocks help make sure everything's flat.
entry 575 - tags: primer, body, flares | | | 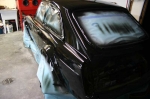 | June 18, 2011 - Now comes my favorite part - unwrapping.
This angle gives you a pretty good idea of the shape of the flares.
entry 584 - tags: body, paint | | | 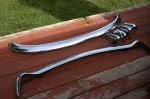 | June 18, 2011 - I've decided to let the paint dry for a couple of weeks before I sand down those runs.
And man, are there are a lot of runs. So this means I'm going to assemble the car now, even though some of this will have to come off again later.
Why? Because that means the car changes from a thing that lurks in the garage to a living car again. I can drive it and enjoy it, and take care of problems one at a time.
But before the bumpers go on that deep black paint, they need a polish. Which is a good excuse to sit on the deck in the sun.
entry 585 - tags: bumpers, body, paint | | | 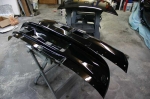 | June 18, 2011 - I painted both the stock front valence as well as the Special Tuning one.
It's amazingly difficult to find a picture of an MG with a Special Tuning airdam that's actually painted instead of being left in white gel coat. We'd never been able to get a good idea of how it looked, so I figured I'd just paint it and we could bolt it on to see.
entry 586 - tags: paint, body | | | 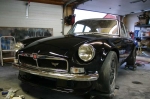 | June 18, 2011 - And voila, the front of the car!
The Special Tuning airdam was the clear winner. I really like the look of the stock part, but with the extra muscle from the fenders the nose just looked...odd. This should balance it out nicely. Once the car's out of the garage I'll get more pictures of it, but overall I'm pretty happy.
We also removed the bumper overriders. Long-time readers will remember that's one of the first things I tried with the car, back in April 2008. Then, it looked wrong. Now, with the beefier looking front and a raft of detail changes, it looks better this way. At least, that's the thought today. We can always put them back on.
entry 587 - tags: body, overriders | | | 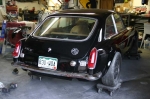 | June 18, 2011 - We decided to leave the overriders in the rear as well.
The car gets a bit busy otherwise, and again those flares give some extra body to what's going on back there.
Hopefully I'll have the car assembled enough to take out tomorrow. I want to get some shots from a bit further away and walk all the way around the car!
entry 588 - tags: body, overriders | | |  | June 20, 2011 - I took the car out with the intention of taking some pictures.
You have been warned.
The car does look different. Wider. That's partly due to the lack of overriders, I think. But it's also because the flares flow into the fenders so nicely. And heck, it is wider than it once was.
entry 590 - tags: body | | |  | June 20, 2011 - I'm not sure what it is, but there's something completely British about this shot.
Not the background, of course. But the slightly frumpy yet muscular look of the car.
entry 591 - tags: body | | | 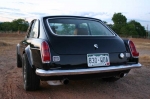 | June 20, 2011 - The rear looks particularly wide, partly because the badges aren't installed.
Janel wants to keep them and I didn't fill the holes, so they will go back on. I need to buff the paint first. That's also why the mirrors and the chrome side trim aren't installed.
entry 592 - tags: body, badges, emblems | | | 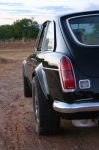 | June 20, 2011 - A closer look at how the flares fit with the body.
I could not be happier with them, especially the rears.
entry 593 - tags: body, flares | | | 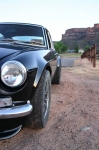 | June 20, 2011 - And here's the view from the front.
The fronts are definitely a beefier design, and I was a bit worried they wouldn't suit the car. But they do, echoing the round shape of the hood and fenders.
Yes, I know I need to change out that fastener behind the bumper.
entry 594 - tags: body, flares | | |  | June 20, 2011 - My new desktop wallpaper.
Until the next time I shoot sunset photos, and I get out 15 minutes earlier so I can get the golden light on the flanks. This shot would have been absolutely killer...
entry 595 - tags: body | | | June 21, 2011 - It's been a gratifying day.
I posted pictures of the car to the various forums that have been interested in it over the years(!), and the response has been very good for the ego. Actually, even I'm finding the end result stunning. I've had it in my head for a couple of years now and here it is in the metal, and it works better than I expected. Some of it is the details - the way the clear front lights, deleted overriders and air dam beef up the front to match the flares, for example. Some of it is just the way the body flows in a way it never has before. I've spent a lot of time just running my hand over the car.
I also drove it to work. Of course. And as a result, when I got home, I changed out all four springs to a stiffer setup (375/300), bumped up the damping and realigned one of the exhaust pipes to keep it from leaning on the body. You know, the usual post-drive changes. I think what the car really needs is some roll stiffness, though. I'll put on a rear sway bar and beef up the front one later this week and see what that does.
entry 596 - tags: ego, body, suspension | | | 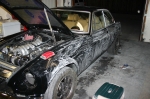 | June 27, 2011 - So much for that nice pretty paint.
I decided it was time to start sanding. I hit the worst runs with wet 500 grit, then moved to 1000 to flatten the rest of the car. It's going nice and quickly, although it's easy to see that I've had to remove a lot of the trim I installed just a week or so ago. Sigh. Still, it should look amazing when I'm done. And once this is all smoothed out, I'll be able to install the side trim and mirrors and even some of the new interior panels. Oooo!
entry 604 - tags: body, paint | | |  | July 6, 2011 - After work today, I decided I just had to take the MG for a run.
I hadn't seen it outside the garage since all the sanding and the complete assembly. I gave up on trying to fabricate excuses and just took off.
It certainly is a lively little thing.
Anyhow, here's Nigel. Did I ever mention the car's been named Nigel Brimstone? Well, he has. So here's Nigel all assembled. Mirrors, side trim, badges. There are no elements that look unfinished or require apology. And he looks good! Sure, the paint isn't perfect. But in the real world with a bit of dust, out of the merciless fluorescent lights, he looks just fine. Time to start working on the driving experience a bit more.
entry 626 - tags: paint, body | | |
|

 THE DIARY