| THE MG |
|
|
 | | 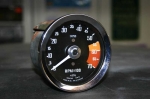 | November 8, 2010 - Amongst all the excitement of the first drive, the new tach showed up.
I'll wire this into the car in the next couple of days and hopefully have a functioning tach. Fingers crossed!
It's in excellent shape, can't complain there.
entry 436 - tags: tach | | | 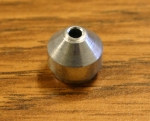 | November 10, 2010 - One step forward, one step back.
Good news - the new tach works! Well, it works once you remember to actually connect the GM tach wire to the MG harness. Interestingly, it seems to read accurately. I didn't have an OBD-II scanner plugged in to read the exact engine speed to confirm, but the car seemed to be idling right around 1000 rpm cold and that's reasonable. I checked the idle at right around 900 after the drive the other day. Interesting - I'd heard the LS engines put out a "four-cylinder" signal, but I figured that was just because a lot of new fours use a waste-spark ignition and thus look more like an 8. Regardless, I'm not going to complain about it! That was easy.
I also spent some time on the brakes. A bit of fooling around and I managed to get rid of a big air bubble in the front of the master cylinder. Voila, a hard pedal! Nice and hard. But the front fitting on the master was still leaking. This will not do. So I pulled it off and yup, the flare looks deformed.
I figured this was probably the case on Sunday when I was bleeding the brakes, but I was hoping that tightening the joint would solve the problem. Of course it didn't, and in doing this I also damaged the seat in the master cylinder - that's it in the picture. No surprise here. Luckily, the seats can be removed so I'll just call Wilwood and order a replacement.
At the same time, I noticed that the master had a big F and R on the outlets. Now, from my understanding, there shouldn't be any difference between them. I did read a blurb in Hot Rod or Car Craft a while back claiming there was and that swapping the F and R lines around solved a soft pedal problem. I still don't understand how - but since I had to rebuild one of the lines to fix that flare anyhow, I figured I'd swap them. This means new lines for both the front and rear outlet, both pretty short but relatively complex. So now I'm back to no brakes at all. Still, I have a clear vision of the way ahead.
entry 437 - tags: brakes, tach, wiring | | | November 10, 2010 - I just got off the phone with Wilwood.
That little tapered seat that is damaged? You can't buy it separately. What an idiotic decision. I know there are giant bins full of them at Wilwood (or wherever this particular master is actually produced), but mere mortals cannot obtain one. Instead, I have to pay for a brand new master cylinder.
Most of Wilwood's masters are just fitted with a 1/8" NPT fitting, and you screw in the adapter you need. If the seat gets damaged, you screw in a different $3 adapter. Not this one, of course.
That is a very poor choice on Wilwood's part. I'll get my replacement, put the current one on the shelf for if/when the master ever needs rebuilding, and look elsewhere for my master cylinders in the future.
entry 438 - tags: brakes | | |  | November 10, 2010 - I've been thinking about the radiator.
My current one is huge - 20" high and 26" wide. It was the smallest one AFCO had that would work for me without going to a miniature Scirocco setup. I managed to squeeze it into the car, obviously, and it does still have 5" of ground clearance. But it came at a cost. The air intake is up against the top of the radiator and I'm having trouble figuring out how to mount a fan shroud that will sit far enough away from the core to be useful. Since it sits so low, I'll have to run the Special Tuning air dam instead of the original MG nose. That's probably a good thing for high-speed stability, but I'd prefer to have the choice.
Meanwhile, Flyin' Miata just came out with a radiator intended for Miatas with LS3 engines. It has the correct fittings on the correct sides of the rad. It's 25" wide by 15.5" high. The core design is more efficient than my current radiator so it will cool better, and there's a bolt-on fan kit available. I'll be able to mount it so that the bottom of the radiator is higher, the top of the radiator is lower and I might even gain a bit of room for an overflow tank.
It'll add to the cost - I need to buy fans anyhow, but I already have a radiator of course - and I'm going to tweak a couple of fittings on it, but I think the end result will work better.
entry 439 - tags: radiator | | | November 10, 2010 - There's a new master cylinder on the way here.
I probably could fix the existing seats, especially if I had access to a lathe. But a new master is the safest way to go. Sigh.
The brake lines are bent and my new caliper brackets arrived today, so the brake system will be complete as soon as the master arrives. One more item off the list. Now all I have to do is figure out how to make the emergency brake work!
I also ran into a little problem with the PCV system. A 90 degree elbow rotted away on me. I'll see if I can pick up a generic replacement at the auto parts store.
The current giant rad may have a new home already in a Subaru-engined VW camper. Excellent. I'm looking forward to the new one, I'll be able to drop the top of the rad down by 1" and lift the bottom by 2.5". Better fitment all around.
entry 440 - tags: radiator, brakes | | | 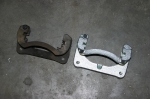 | November 11, 2010 - Wow, the new caliper brackets sure are shiny!
I've never seen a brand new set before, and I'm pretty sure new Miatas don't have that sheen to them. You can see the extra height in the new one, that gives clearance for the larger brake rotors. Usually people source these off a junk Miata, but we're all out at Flyin' Miata and it's not clear when we're going to see more. So I took the easy way out and just ordered these shiny ones. I did have to transfer two rubber seals from each old bracket though.
I did find out why the master cylinder has the F and R ports. There are two pistons inside, and the one closest to the pushrod pressurizes before the second one starts to move. So the first piston should be used on the front brakes. Interesting!
entry 441 - tags: brakes | | | 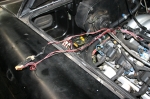 | November 11, 2010 - While poking around the engine bay, I decided to trace this joint connector back.
It was originally up at the front of the engine after running up along one of the fuel injector legs of the harness. Weird, there's no reason for it to do that. I'll shorten things up.
entry 442 - tags: wiring | | | 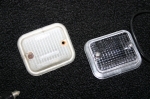 | November 11, 2010 - Sometimes you just have to do little stuff that feels good.
The reverse light lenses on the back of the car looked awful. Back when the MG was still on the road (two years ago!) I ordered a new set. I put them on today and wow, they look good! Two minutes worth of work and I get a feeling of satisfaction.
Of course, this also meant I needed to make sure they were working. Naturally they were not. After a bit of digging around, I found that I'd misidentified the feed wire from the front of the car. I swapped that around, plugged in the lights and one worked! The other, not so much. The cracked lens had let in dirt and moisture, so it was all crusty inside and the contacts were corroded. I stuck it in the bead blaster, gave it a quick shot and it looks brand new! I never thought I'd use the blaster to rejuvenate electrical parts, but it really works nicely on bad contacts. And voila, bright lights in the rear.
Of course, while I was working on electrical stuff I decided to find out why the turn indicators weren't working. After a bit of digging around, I found out that the turn indicator wiring passes through the hazard light switch. Okay. I plugged that in and got...inconsistency. The flasher worked sometimes, but usually not. I checked voltages and found out there was a lot of resistance inside the switch. Basically, the contacts were all corroded. So I disassembled it, stuck it in the blaster and put it back together. Pretty interesting to do, actually. Now I know just how a Lucas hazard light switch works!
That got rid of my resistance, but the flashers are still have a bit of character. There's just enough unevenness in the tempo of the flashes to make you realize it's a mechanical relay working off heat instead of an electronic one!
Looking at the Moss catalog, it appears that hazard switch I fixed is a 1972-only part. It changed in 1973.
entry 443 - tags: wiring, reverse lights, electrical, turn indicators | | | 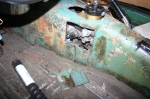 | November 11, 2010 - The T56 transmission has a lockout on reverse.
It's triggered by the ECU, and locks out reverse anytime you're above 5 mph. Pretty smart - I've driven cars with the same lockout triggered by the brake lights, and that works fairly well until you try to downshift from 6th to 5th while braking, and get reverse instead.
The problem is that the solenoid is pretty big. It wouldn't fit in the transmission tunnel. Instead of modifying the tunnel, I decided to leave the solenoid off and then build an access panel in the side of the tunnel so it can be installed once the transmission is in situ. I also need to put a small bulge in the panel to clear the solenoid, but not too big. I'm almost done that now.
entry 444 - tags: reverse, transmission, fitment | | | November 11, 2010 - Janel asked me a good question.
"What do you have to do in order to get the car to the point where you can drive it around more?" The answer? Not that much, really. The biggest delay right now is the master cylinder (which should be here tomorrow), some anti-rattle hardware for the brakes (ditto) and the cooling. Since there are no fans on the radiator at the moment, I'm a bit leery about driving it too far. I'll have the new radiator and fan setup before too long and then I have to mount it.
But really, it's not far off. Sure, the car will look rough with the cut-out wheel wells, a stripped interior and exposed wiring. But it'll be mechanically sound enough to take on longer drives on real roads. Maybe I should commit and get a set of plates for it!
entry 445 - tags: almost there | | | 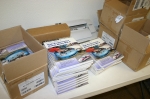 | November 12, 2010 - It really doesn't have much to do with the MG, but the new book is here!
Actually, working on this book did prevent me from working on the MG for a while. Still, it's an exciting day. After spending so much time with the book in digital form, holding it in my hands (it's heavy!) is a treat.
More information on the book can be found at slowcarfast.com.
entry 446 - tags: book | | | 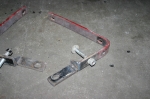 | November 13, 2010 - I felt like making some noise today, so it was time to modify the bumper supports.
The original design had the bumper supports bolted laterally through the frame horns. Those were cut off quite some time ago, and there's a crossmember in the way. Luckily, I realized this was coming when I installed the crossmember so I welded some captive nuts inside for the bumper to bolt to. The front bolt was left as-is.
All I had to do was cut the support in half, turn the rear section 90 degrees and weld it up with a little plate for strength. Voila!
entry 447 - tags: bumper | | | 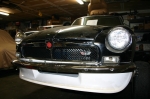 | November 13, 2010 - I also spent quite a bit of time goofing around with the Special Tuning air dam.
It's almost like I'm trying to adapt a piece designed for a different car to an MG. Almost. Anyhow, I've drilled a bunch of holes and hung it in approximately the correct location. The bumper's on quite crooked here to really finish off the appearance.
I'll paint it black at some point and when the car is finished, spend some time evaluating the look. I know it'll help at high speed, but I'm not really worried about front-end lift over 100 mph.
Sharp eyes may notice the Nova badge zip-tied to the grille in the same approximate location that MG put the V8 badge on some cars. I like it.
entry 448 - tags: body, spoiler, bumper, badge | | | 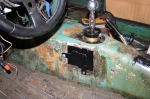 | November 13, 2010 - The access panel for the reverse solenoid lock-out is in place.
It sure doesn't look pretty, especially in shiny black paint trying to make the welds look a boogery as possible, but it does the job. The idea was to 1) make it removable for future transmission removal or solenoid access and 2) add a bulge to allow the solenoid to clear the tunnel. It'll be covered by carpet eventually so it'll never be seen again, and I sealed the gap around the edges. So, not an easy thing to remove. But it can be removed.
The solenoid seems to be working. The spring inside certainly adds to the effort of hitting reverse, and as far as I can tell it's locking out reverse completely above 5 mph. I'll test it further once I'm on the road.
entry 449 - tags: reverse, transmission, fitment | | | November 14, 2010 - I've been hearing from all sorts of people following the "first drive" video.
I feel a little guilty for not making it a better video to watch. The next one will be better.
I get an email every week from The B Hive with weekly specials. It's actually kind of amusing - almost none of the specials are for products I can use, as they've been replaced by non-MG parts in my car!
entry 450 | | |  | November 15, 2010 - With the video of the first drive getting attention, I'm fielding a few questions about the car.
The most common is about the wide track and the suspension choices, typically with people pointing out that I could have used a bolt-in setup from Fast Cars. I did actually use a rear end similar to their design. But here's a recap of the thinking, all gathered together in one place. This is taken from an email I sent to someone.
About the BGT's suspension - I decided to go with Miata suspension on
the car, in large part because it's a setup I understand very well
given my history. I also have a large collection of spare parts, and
this makes it much easier to keep a fleet of cars happy. Being able to
swap brakes between the Lotus replica and the MG came in handy just
last week as I borrowed some parts off the Lotus to get the MG
driveable. It's also much less expensive than buying one of the
coilover setups on the market for the B, and allowed me to toss the
stock subframe and other bits. As an unplanned side effect, I also
saved quite a bit of weight.
So, going with the Miata front suspension meant I had a wider front
track. I could have narrowed it, but then I would have messed up those
beautifully controlled roll centers that I think are a major
contribution to the Miata's handling.
Now I needed a wider rear track to match. I seriously considered going
with a Miata rear end, which is a nicely packaged independent. I've
seen photos of a BGT with this rear end installed, but there were a
couple of problems. The first is the amount of sheer destruction
required to the rear of the car to make it fit. Secondly, the rear end
wasn't strong enough to deal with the assault from the V8, so I would
have had to modify it for a different differential. That's not a major
problem but it was an additional expense. By mixing the appropriate GM
parts, I was able to use the differential from the Camaro and a
standard-length axle housing to make the best use of what I had. If
the live rear doesn't work out, I'll change it over to a Miata rear
eventually, but I'm pretty happy with the overall engineering of what
I have. The car is stronger for it.
entry 451 - tags: suspension | | | 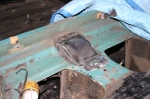 | November 15, 2010 - The top of the diff disagrees with the bottom of the car at full suspension compression.
It's due to the extra bracket on top. So I made a little house for it. I haven't checked to see how the rear seat will sit on top of this, some further creativity may be required.
entry 452 - tags: clearance, rear axle | | | 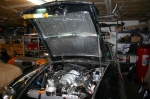 | November 15, 2010 - With the hood mounted, I found myself staring at a really ugly combination of peeling black paint and old Aqua.
So it had to go. A bit of Reflectix heat shielding and some foam tape and voila! All shiny and pretty. It does a nice job of distributing the light into the engine bay as well.
Reflectix is heatshielding and likely won't have much effect on noise, but it's what I had around the shop and it's cheap and basically weightless. I'll be putting down some heavier stuff inside the cabin and I might put some under the hood as well. We'll see.
entry 453 - tags: heat, pretty, hood | | | 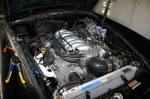 | November 15, 2010 - Here's the current state of the engine bay.
Still some way to go on wiring, but I'm waiting until all the wires are run before covering them up. I'm not sure how to handle the big junction by the fuse boxes, between the MG bullet connectors and the sheer number of wires it's a pretty big bundle. I'm tempted to just build a box to sit over top of it all and hide it from view! Until the car is fully debugged, I'll probably just leave it exposed and ugly.
Currently, I'm in the middle of setting up some relays for the future cooling fans. And in case you're wondering, the note on the rad says "Hook up heater controls" - a reminder to do it when the rad comes out.
entry 454 - tags: engine bay, wiring | | | 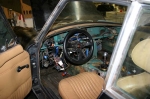 | November 15, 2010 - The interior needs a bit of work still.
Again, lots of dangling wiring. I need to finish swapping over from the MG column switches to the Miata ones which will clear up that particular snarl nicely. I think the tach zip-tied in to the base of the windshield is a nice touch though.
One thing to check off the to do list: brakes. Janel helped me bleed them this morning and the pedal is nice and firm. Just the way it's supposed to be. I do have to remember to bed the pads though, it's easy to forget that when months pass between installation and driving.
entry 455 - tags: interior, brakes | | |
|

 THE DIARY