| LIFE OF A GT |
|
|
 | |  | March 4, 2010 - Driveshaft time.
I've managed to come up with a plan of attack to get me to the First Start of the engine. The exhaust is very high on the list as it's hot and big and determines where many other things go, but before I put the exhaust in I wanted to make sure the driveshaft wouldn't cause a clearance problem with the X pipe.
I'd forgotten to remove the driveshaft from the Camaro, so I jacked it up and pulled the shaft out. Easy, other than the remaining snowbanks and the joy of working on gravel. Don't worry Mom, I had some very large and thick boards under the jackstands to keep them stable!
After a lot of measuring and calculating and measuring again, I cut the driveshaft in half. This was a fairly painstaking cut, as I wanted to make sure it was completely square to the shaft itself. Once that was done, I spent some noisy quality time with the grinder removing the weld off the yoke for the pinion end so I could insert it back into the shortened shaft. More measuring with my new, shorter shaft and I cut off another 0.75". The yoke was an extremely tight fit into the tube, but I was able to coax it in eventually with the assistance of a precision 3lb sledgehammer and some careful placement.
Then I said "hang on a second", double-checked and removed the yoke again. I had it 90 degrees out of phase with the front one, they're supposed to be in phase. Out came the hammer again. When I test-fit the final result in the car, it was all sunshine and happiness in the shop. I'd been aiming for 0.75" to 1" of slip, and I ended up with 0.875". Right in the middle.
To avoid any nasty vibration problems down the road, I took the result to a local driveline shop for alignment, welding and balancing. He checked to see if the yokes were aligned, and was impressed to see that I'd managed to line them up perfectly. I think I was 0.5 degrees off, but apparently this is not a problem!
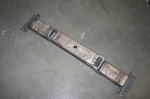
So what's in the picture? That's my transmission mount. As part of this exercise, I realized the transmission had to move over about 0.375". So I chopped it up and reassembled it to the correct dimensions. This makes it possible to install the driveshaft with the engine in the car! It'll also mean less modification to the transmission tunnel for the reverse lockout solenoid in the future. That's still coming up!
I forgot to take pictures of the driveshaft work, so it will make its public debut in a couple of days. Once I pick it up from the driveline shop, there's that step done!
entry 301 - tags: driveshaft, | | | 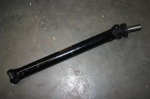 | March 15, 2010 - The finished driveshaft.
Okay, not a terribly exciting picture. But I'm pretty happy with how easy and inexpensive this was.
entry 308 - tags: driveshaft | | | 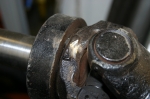 | August 24, 2010 - I found my driveshaft wouldn't give me the ability to get full droop out of my suspension.
That's not good! The problem was two little bosses on the yoke at the transmission end. A couple of minutes with the die grinder and now I have a full range of motion all the way around. The bosses weren't structural as far as I can tell.
One step further! I did a bit more painting with POR-15 under the car tonight and did the final connections on the gas tank, so it's almost time to stuff that axle under the car and call it done. Well, I know it'll come out again for various reasons. But maybe not for a long time.
entry 370 - tags: axle, driveshaft | | | 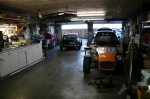 | November 7, 2010 - The brakes proved problematic to bleed.
I think I have one bad flare which will have to be sorted out, and it took forever to get the rears working. But I got them to the point where they'd stop the car, so it was time.
I bolted on the wheels, checked tire pressures, attached the hood and dropped the car to the floor. It's always fun how much smaller they get when they're sitting on their feet. This car's been on jackstands in the garage for a long, long time. The springs are 8" 375 lb in the front and 10" 250 in the rear, mostly because that's what I have. I snugged the spring perches up to the springs at full droop and nailed the ride height almost perfectly.
After a lot of shuffling around and shoving of bits and pieces into handy corners, I was able to free the MG and point it towards freedom.
entry 428 - tags: first drive, brakes, suspension, springs | | |  | November 7, 2010 - The first drive!
You can watch it on YouTube.
Overall, the first drive was a big success. Nothing broke. Nothing (unexpected) leaked. The car worked as expected. Cue the big celebration!
The car does feel very, very powerful and very light. The Miatas with a similar engine feel a bit beefier, possibly due to much fatter tires. The brakes were definitely not up to snuff - you can see me check them as I leave the garage. They were good enough for this little tour though.
The suspension was not noticeable, which means it was working! Obviously, tougher tests will come. No noises, clunks or anything worrisome. The clutch worked well once we both got used to where it engaged - the bigger problem was the gas pedal which is currently sitting much too high. The sound is excellent. The transmission did try to pop out of reverse, which is a trick it had been doing in the Camaro. There, I thought it was a matter of shifter adjustment and I spent some time fine-tuning that. But I was wrong. I'll look into that.
It wasn't a long drive, just a proof of function. And it did just that!
entry 429 - tags: first drive, video | | | 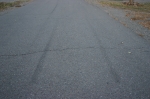 | November 7, 2010 - Well, you have to don't you?
I gave the car a bit of throttle and both rear tires immediately lit on fire. They're not great tires - Azenis 215s from 2006 or so - but it was still pretty spectacular. I don't have the rear seat in the car or the panel that covers the old battery boxes, so the inside of the car immediately filled with blue smoke. Very entertaining.
We did not get this on video, unfortunately. And we'd attracted enough attention the first time! There will be opportunity enough in the future.
entry 430 - tags: burnout, first drive | | | 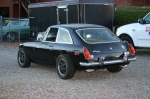 | November 7, 2010 - Finally, a chance to take a few steps back and see how the car looks.
Well, it'll look a lot better with the fender flares on it. Right now, it looks as if someone went after the fenders with a Sawzall. But the overall stance is good, the ride height is where I wanted it and the mufflers are nicely tucked into place. We'll call this a success.
I should note that it's been almost exactly two years since we bought the Camaro that provided the drivetrain, and the MG came apart two weeks after that. So this is the culmination of a long, long process. I suspect some people doubted it would ever more.
entry 431 - tags: first drive | | | 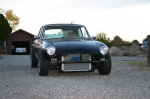 | November 7, 2010 - Without any grille on the front or any lower bodywork, you can really see how ridiculously oversize the radiator is!
It'll all be covered once the MG Special Tuning front air dam is installed, and the chrome on the bumper and grille will finish off the car well. I may fog the radiator with black paint to make it a bit more subtle.
It doesn't look much like an MG here, but it does still somehow manage to look British.
entry 432 - tags: first drive, radiator, body | | | 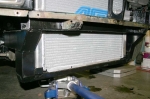 | November 8, 2010 - I posted about the first drive on a few forums, and the responses have been interesting.
A few people who didn't understand that it was a first drive of an unfinished car and who had comments on the cut fenders. Not everyone can look at a project in process and see the final result! A few votes for the factory Sebring fender flares, but they just don't suit the style of the body to my eyes. Maybe if I'd grown up watching MGs duke it out on the race circuit. I personally think the stock Pininfarina body is beautiful, and the Sebring flares just look like slapped-on blobs. It's going to be a challenge to fit the Rabbit flares gracefully (and symmetrically!) but their overall shape complements the car to me.
One of the most common comments was about how low the radiator sits. Granted, when the car is viewed from the front with no bodywork it's an imposing piece! But it's still 5" off the ground, which is about the same as the oil pan on a Miata. Also, as you can see in the picture, it's not unprotected. That bar underneath is 1"x2" with a fairly hefty wall thickness, supported by an extension of the frame rails. I could probably use it to jack up the car.
But it does have me thinking. Flyin' Miata recently came out with a much smaller radiator for the V8 Miatas. It's got all the correct fittings on it and there's even a high-quality shroud and fan kit available that I could just drop in. I'd have to buy new fans for this one anyhow. I might grab the dimensions and see what making the change would imply. I would like to have the option to run the stock nose instead of the Special Tuning airdam. Hmm.
entry 433 - tags: radiator, first drive, protection | | |  | June 20, 2011 - Out of the garage!
I bolted the last few bits and pieces back on the car and took it for a short drive. Goodness gracious, it's a lively little thing. I've been working on the Targa Miata concurrently with the MG, and they should have pretty similar power/weight ratios. The Miata's engine hasn't been happy, but I hadn't realized just how down on power it is. The MG brought that to my attention fairly emphatically.
It's not perfect, of course. Some things are greatly improved since the last drive, such as the seal between the headers and the head. But there are a few other things I'd forgotten about, such as the over-assisted steering. Still, it feels great to get behind the wheel again, windows open and footwell vent blowing cool air on my feet. I could get used to this.
entry 589 - tags: drive | | |
|

 THE DIARY